
This guide walks you through connecting your first WhatsApp account, warming it up, organizing contact leads, and running your first bulk messaging campaign. It is for people who have installed and signed in to Casii but are new to its workflow.
For your first use, follow this order: prepare → connect an account → warm up the account → collect leads → test with a small campaign. Account warm-up is an important preparation step before bulk messaging; do not skip it.
1. Before you begin
Have the following ready:
- The Casii desktop app, installed and signed in.
- A WhatsApp account you can log in to and the phone needed to complete login.
- A network that can reach WhatsApp. If you use a proxy, have the connection details from your provider.
- A few test contacts and the message you intend to send, so you can check what they actually receive.
Your first goal: Connect the account, complete the warm-up schedule under your chosen rule, then send to a small number of test contacts who have agreed to receive messages. Check the account state and message content before expanding your use.
Risk reminder: warm up the account before bulk messaging; do not send in bulk immediately after login. Sending bulk messages to strangers from a new or long-inactive account may quickly trigger platform restrictions. Do not test with your main support account or an account used for important customer relationships. Warm-up, proxies, and sending intervals cannot guarantee that the platform will not restrict your account.
Go to account warm-up → to choose a rule and create a warm-up task.
2. Key concepts
- Instance: An independent environment in the app for opening and running WhatsApp. Create an instance first, then log in to an account there. Separate instances manage separate accounts.
- Business instance: An instance for routine work, such as viewing chats, joining groups, and running campaigns.
- Warm-up instance: An instance used in warm-up tasks and managed separately from business instances. You can change its purpose when the conditions are met.
- Proxy: An intermediary connection an instance uses to access the network. Test it after configuring it.
- Lead: Contact information you collect or import and view in Lead Management. Collecting a phone number does not mean it is registered on WhatsApp.
- Bulk messaging campaign: A task with sending accounts, recipients, messages, and sending settings. Open Campaign from the sidebar to manage campaigns.
3. Connect your first WhatsApp account
After this section, you should be able to open a logged-in WhatsApp account in Casii.
3.1 Prepare your network or proxy
Do not confuse TUN mode/system proxy with static/dynamic proxy:
- TUN mode/system proxy describes how a proxy tool on your computer handles traffic. Different tools intercept different traffic; enabling a system proxy alone does not ensure that an instance can connect. When testing such a tool, enable TUN mode as its instructions require, then check whether the instance connects.
- Static/dynamic proxy describes whether the exit address changes. A residential proxy describes the type of exit network. A dynamic proxy’s “sticky session” usually keeps one exit for a period; confirm the duration and conditions with the provider.
To bind a specific proxy to an instance:
- Open Proxy List in the sidebar.
- Add a proxy and enter the connection details supplied by your provider.
- Test the proxy before using it to create an instance. If the test fails, check the address, port, credentials, and expiration date.
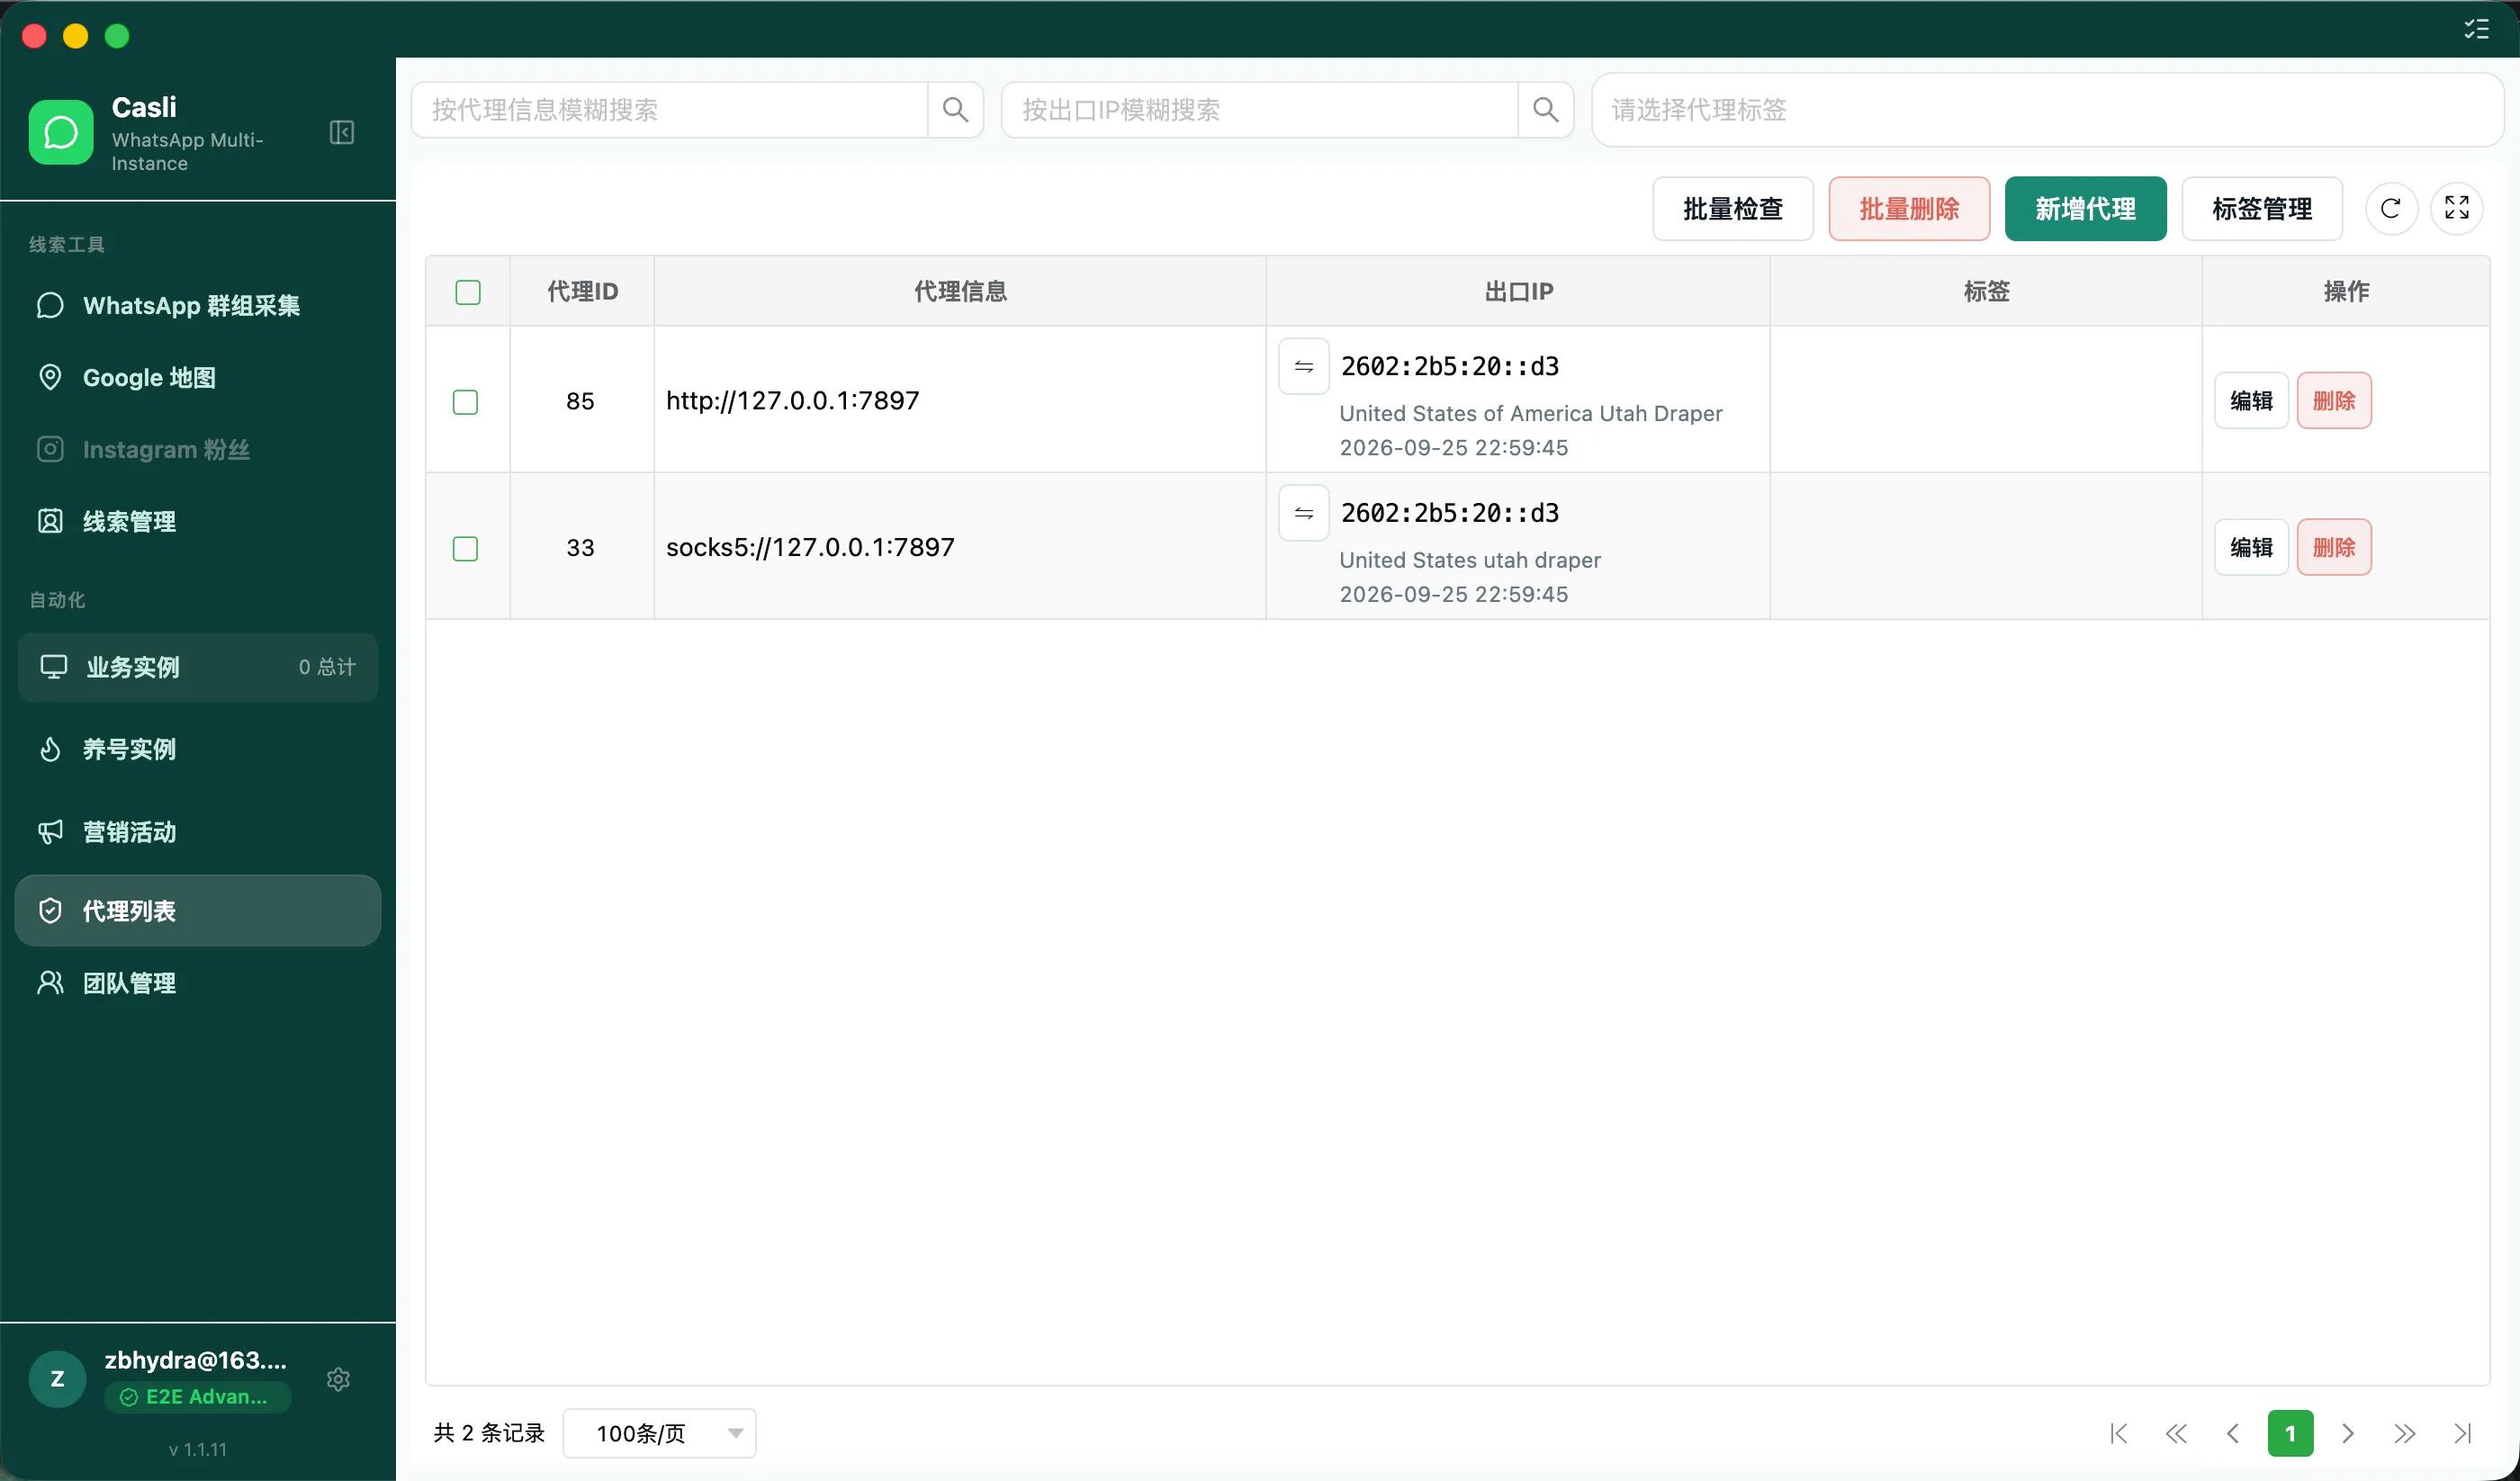
Done when: The proxy appears in the list and passes its test. If you do not bind a proxy, confirm that your computer’s current network can reach WhatsApp.
3.2 Create a business instance
- Open Business Instances in the sidebar.
- Select the + button on the page to open the new-instance dialog.
- Enter an easily recognized name, such as “Test account.”
- Under proxy settings, choose the proxy you just tested; if you will not bind one, choose No Proxy.
- Complete the remaining required fields and save.
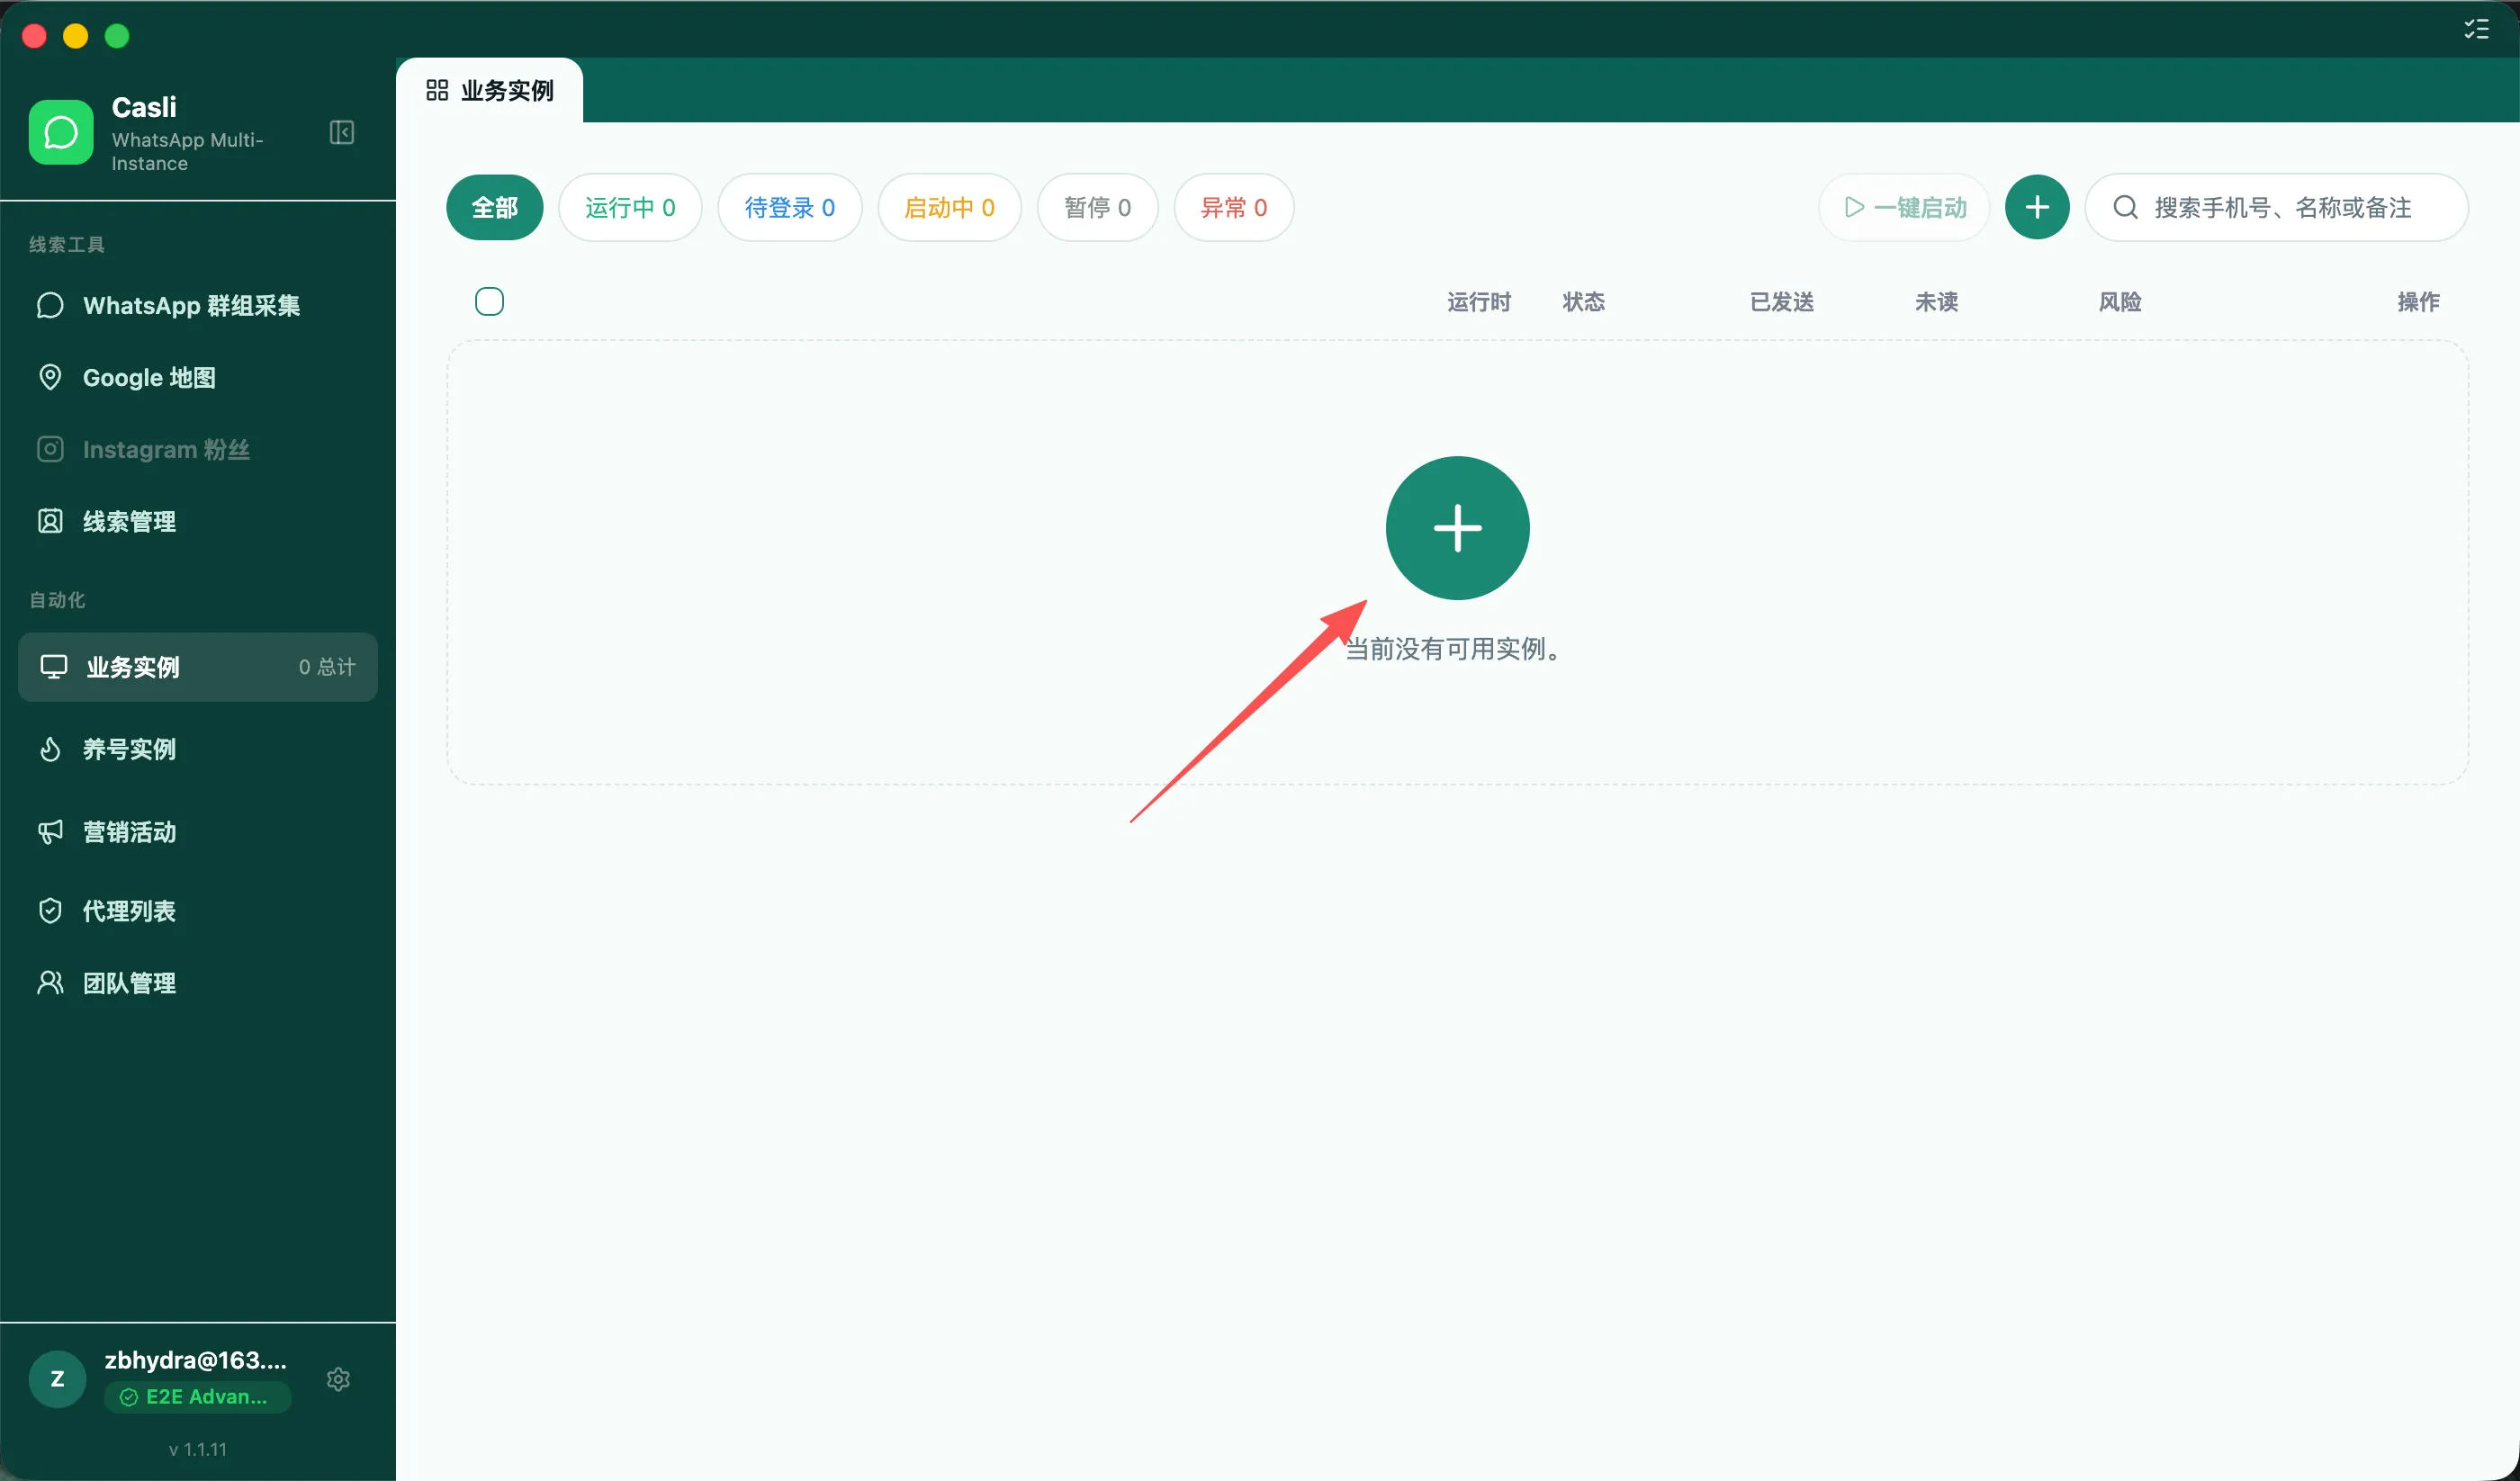
Done when: Your new instance appears in the business-instance list. Creating it does not log in to WhatsApp; you still need to start it and log in.
3.3 Start the instance and log in
- Find the new instance in the list and select the start button on its row. Start just this one instance for your first attempt.
- Wait for the WhatsApp page to open.
- If prompted, follow the on-screen steps to log in using your phone.
- Confirm that the account’s chat page opens and the instance state becomes Running.
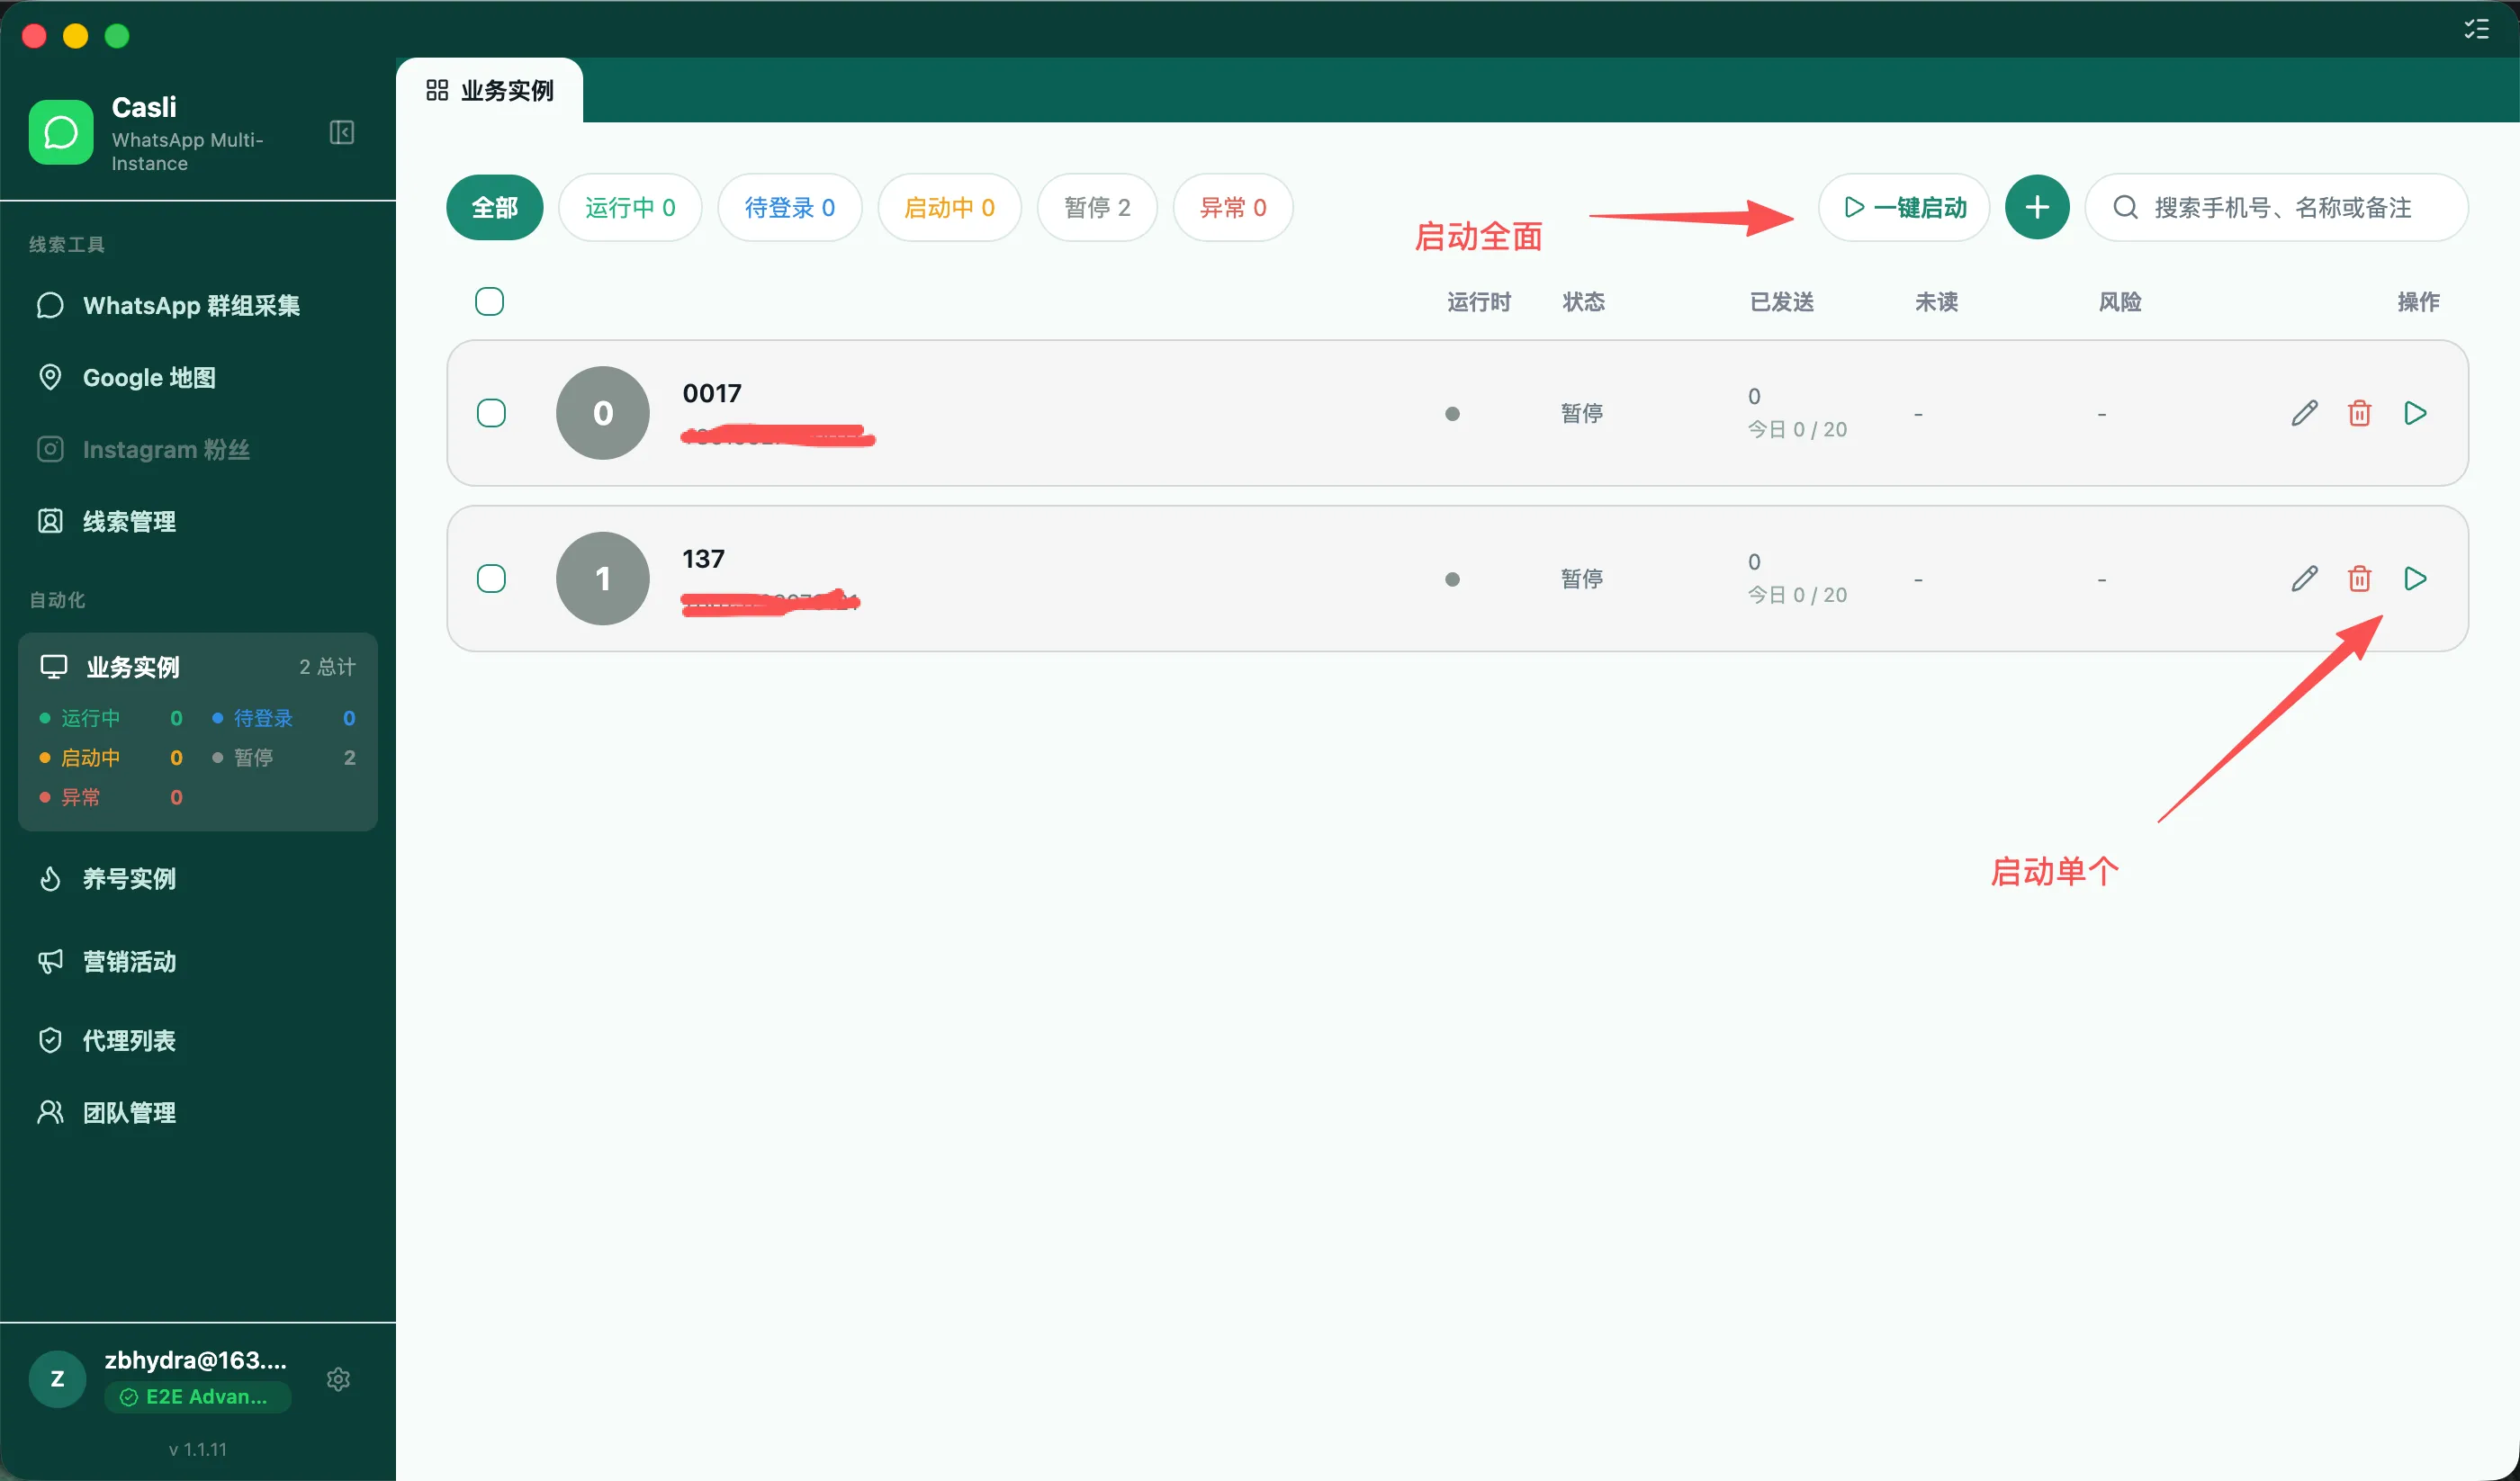
Done when: The instance is Running and you can see the logged-in WhatsApp chat page. Awaiting Login still requires login and does not mean the account is connected.
If the page does not open after a long wait, see Instance fails to start or keeps loading.
4. Warm up the account before bulk messaging
Warm-up schedules account interactions according to a rule. We recommend it as preparation before bulk messaging, particularly for new or long-inactive accounts. Do not send in bulk immediately after login. Complete the selected rule’s schedule, review its execution records and the account state, then move the account to a business instance for a small sending test.
The rule’s duration describes the task schedule. It does not mean an account becomes safe for bulk messaging after that number of days.
4.1 Prepare a warm-up instance and choose a rule
- Open Warmup Instances and create the instances you need. You can change an existing business instance’s purpose.
- Start the instance and log in to WhatsApp.
- Open Warmup Rules and review the rule you plan to use, especially its mode, duration, daily run window, and interaction schedule.
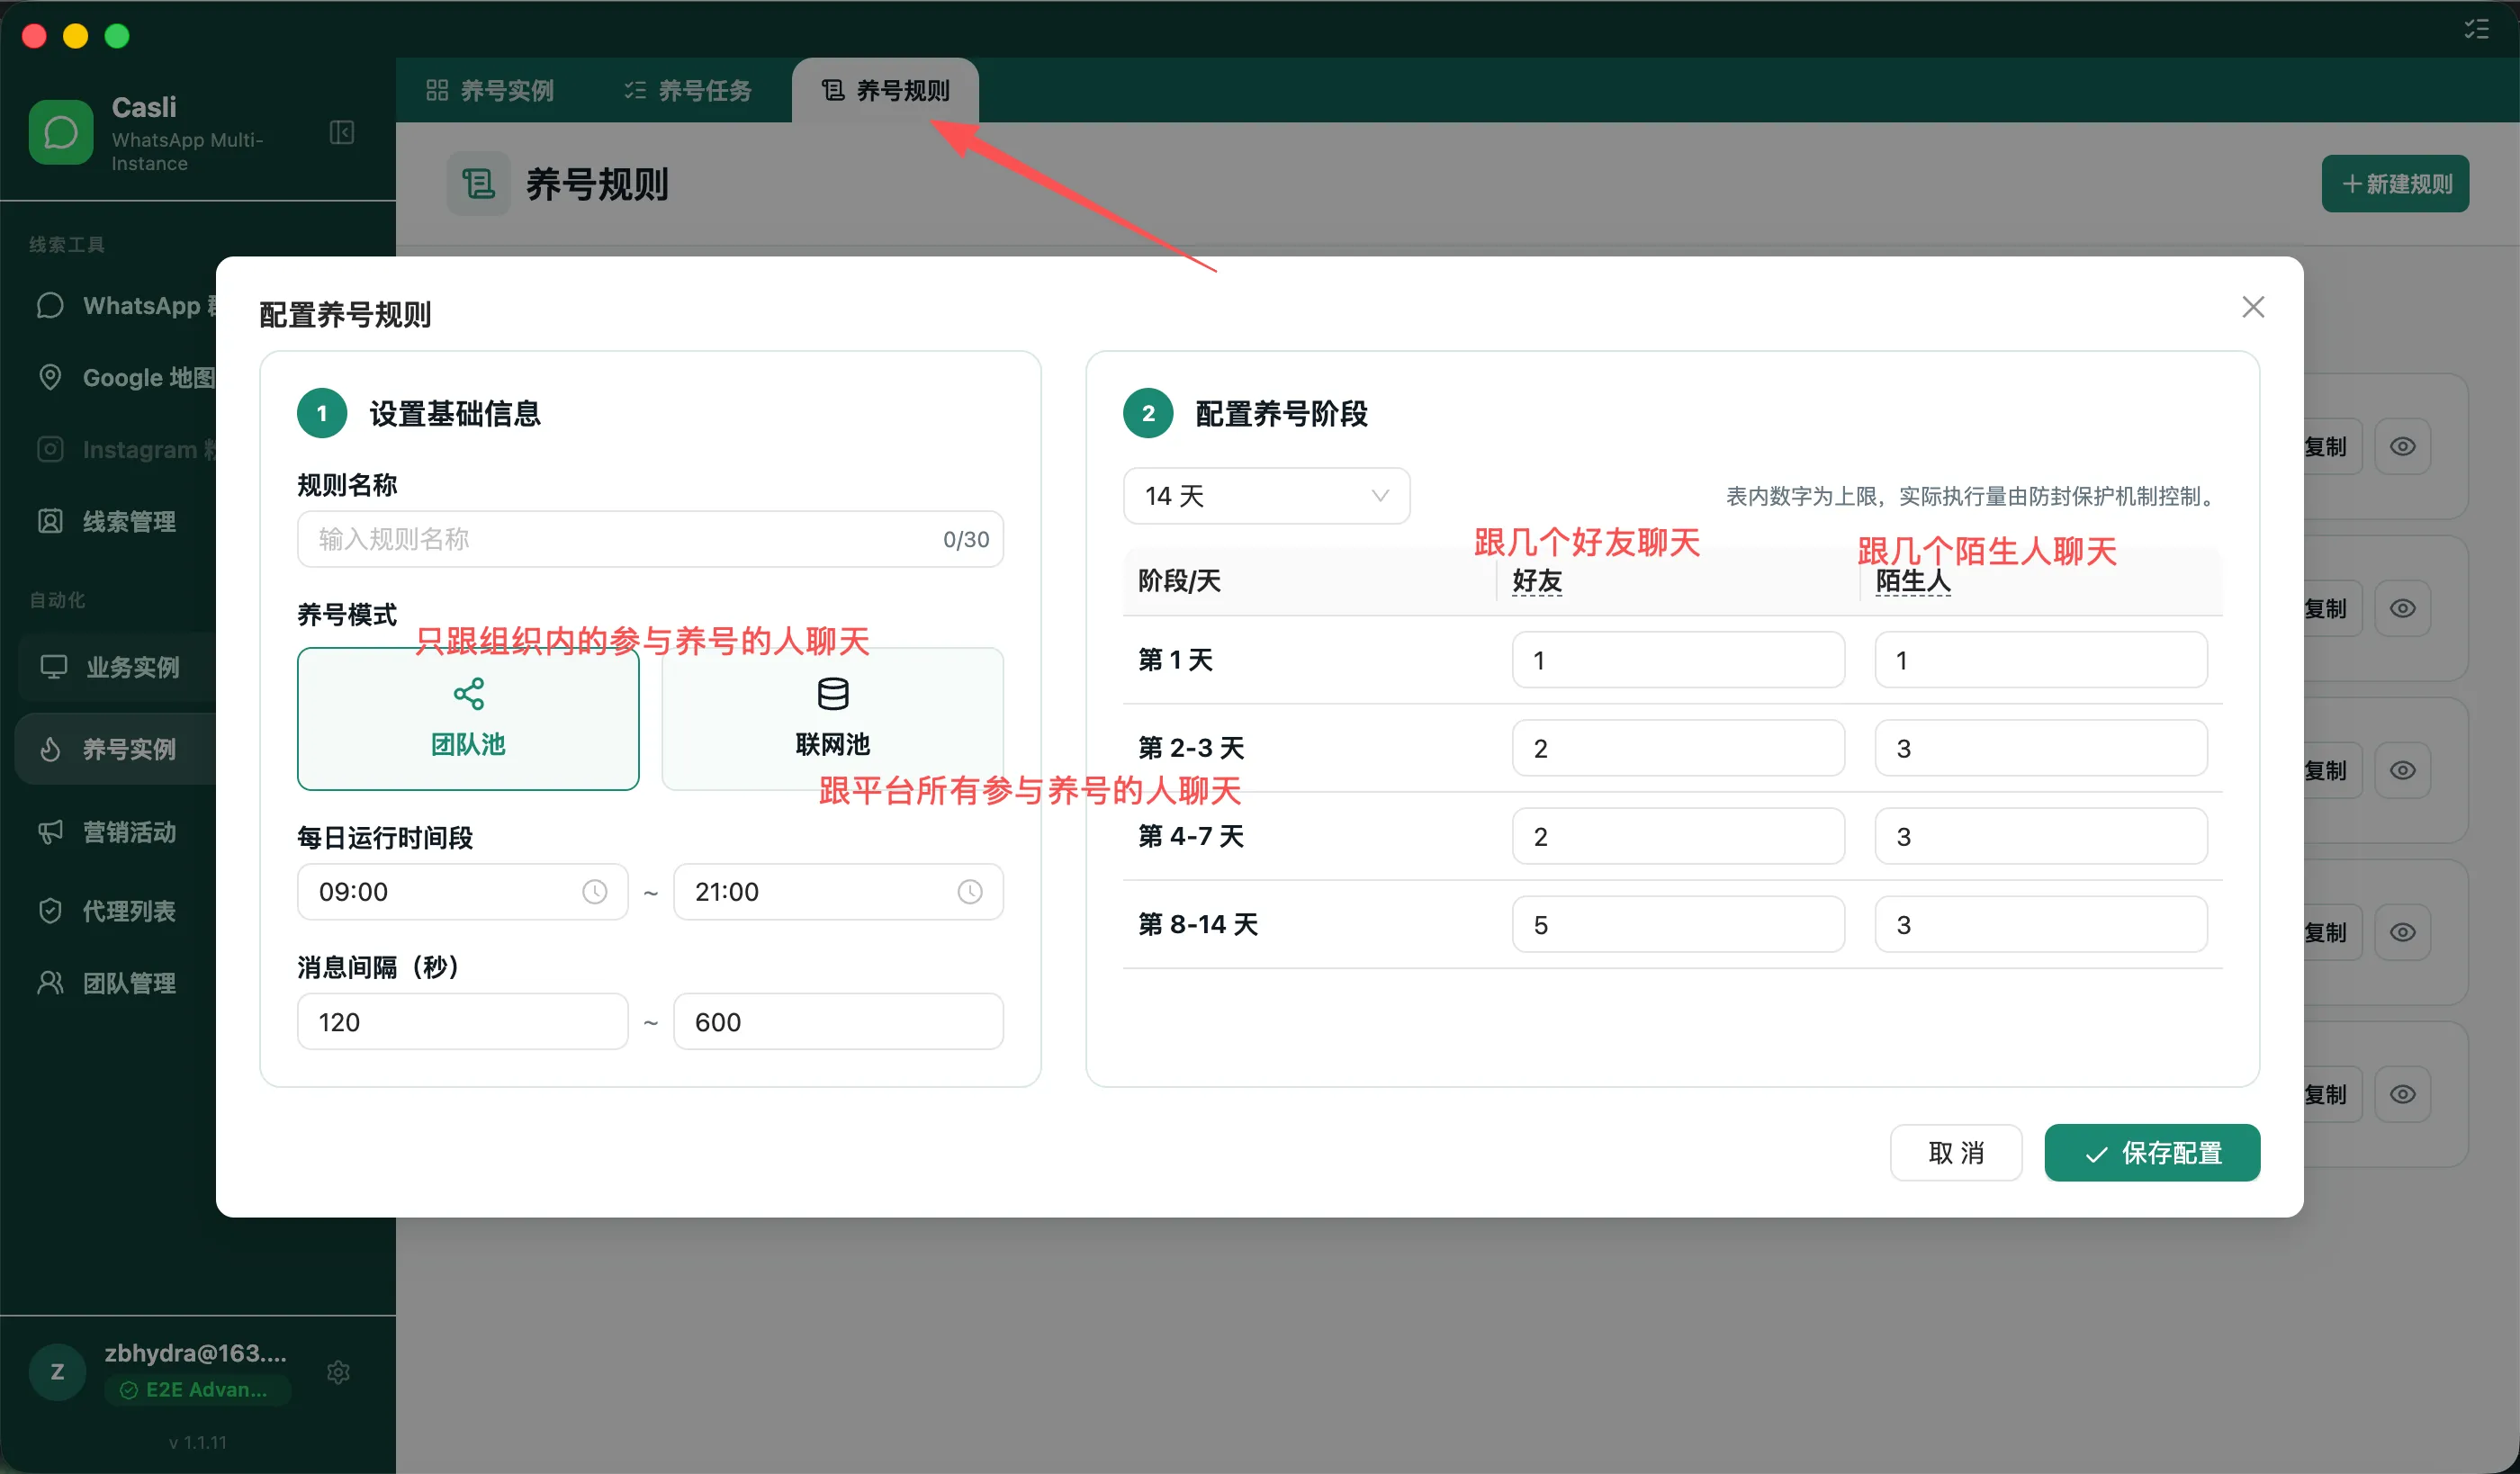
The numbers and “silent” in rule names mean:
- 14-day/28-day rules: Interactions are scheduled by the phases configured for the selected period.
- 7 silent + 14 days/7 silent + 28 days: A seven-day silent phase comes before the subsequent interaction phases.
- Silent phase: No proactive warm-up interactions are scheduled in that phase. The account is not necessarily offline, and WhatsApp message reception is not disabled.
Done when: You have selected a rule, and the warm-up instances intended for the task are logged in and running.
4.2 Create and start a warm-up task
- Open Warmup Tasks and select New Task.
- Name the task and select a warm-up rule.
- Select the running WhatsApp execution accounts, then save.
- Find the task in the list and select Start.
- Select View to check each account’s execution state, warm-up progress, and today’s sent, replied, and failed counts.
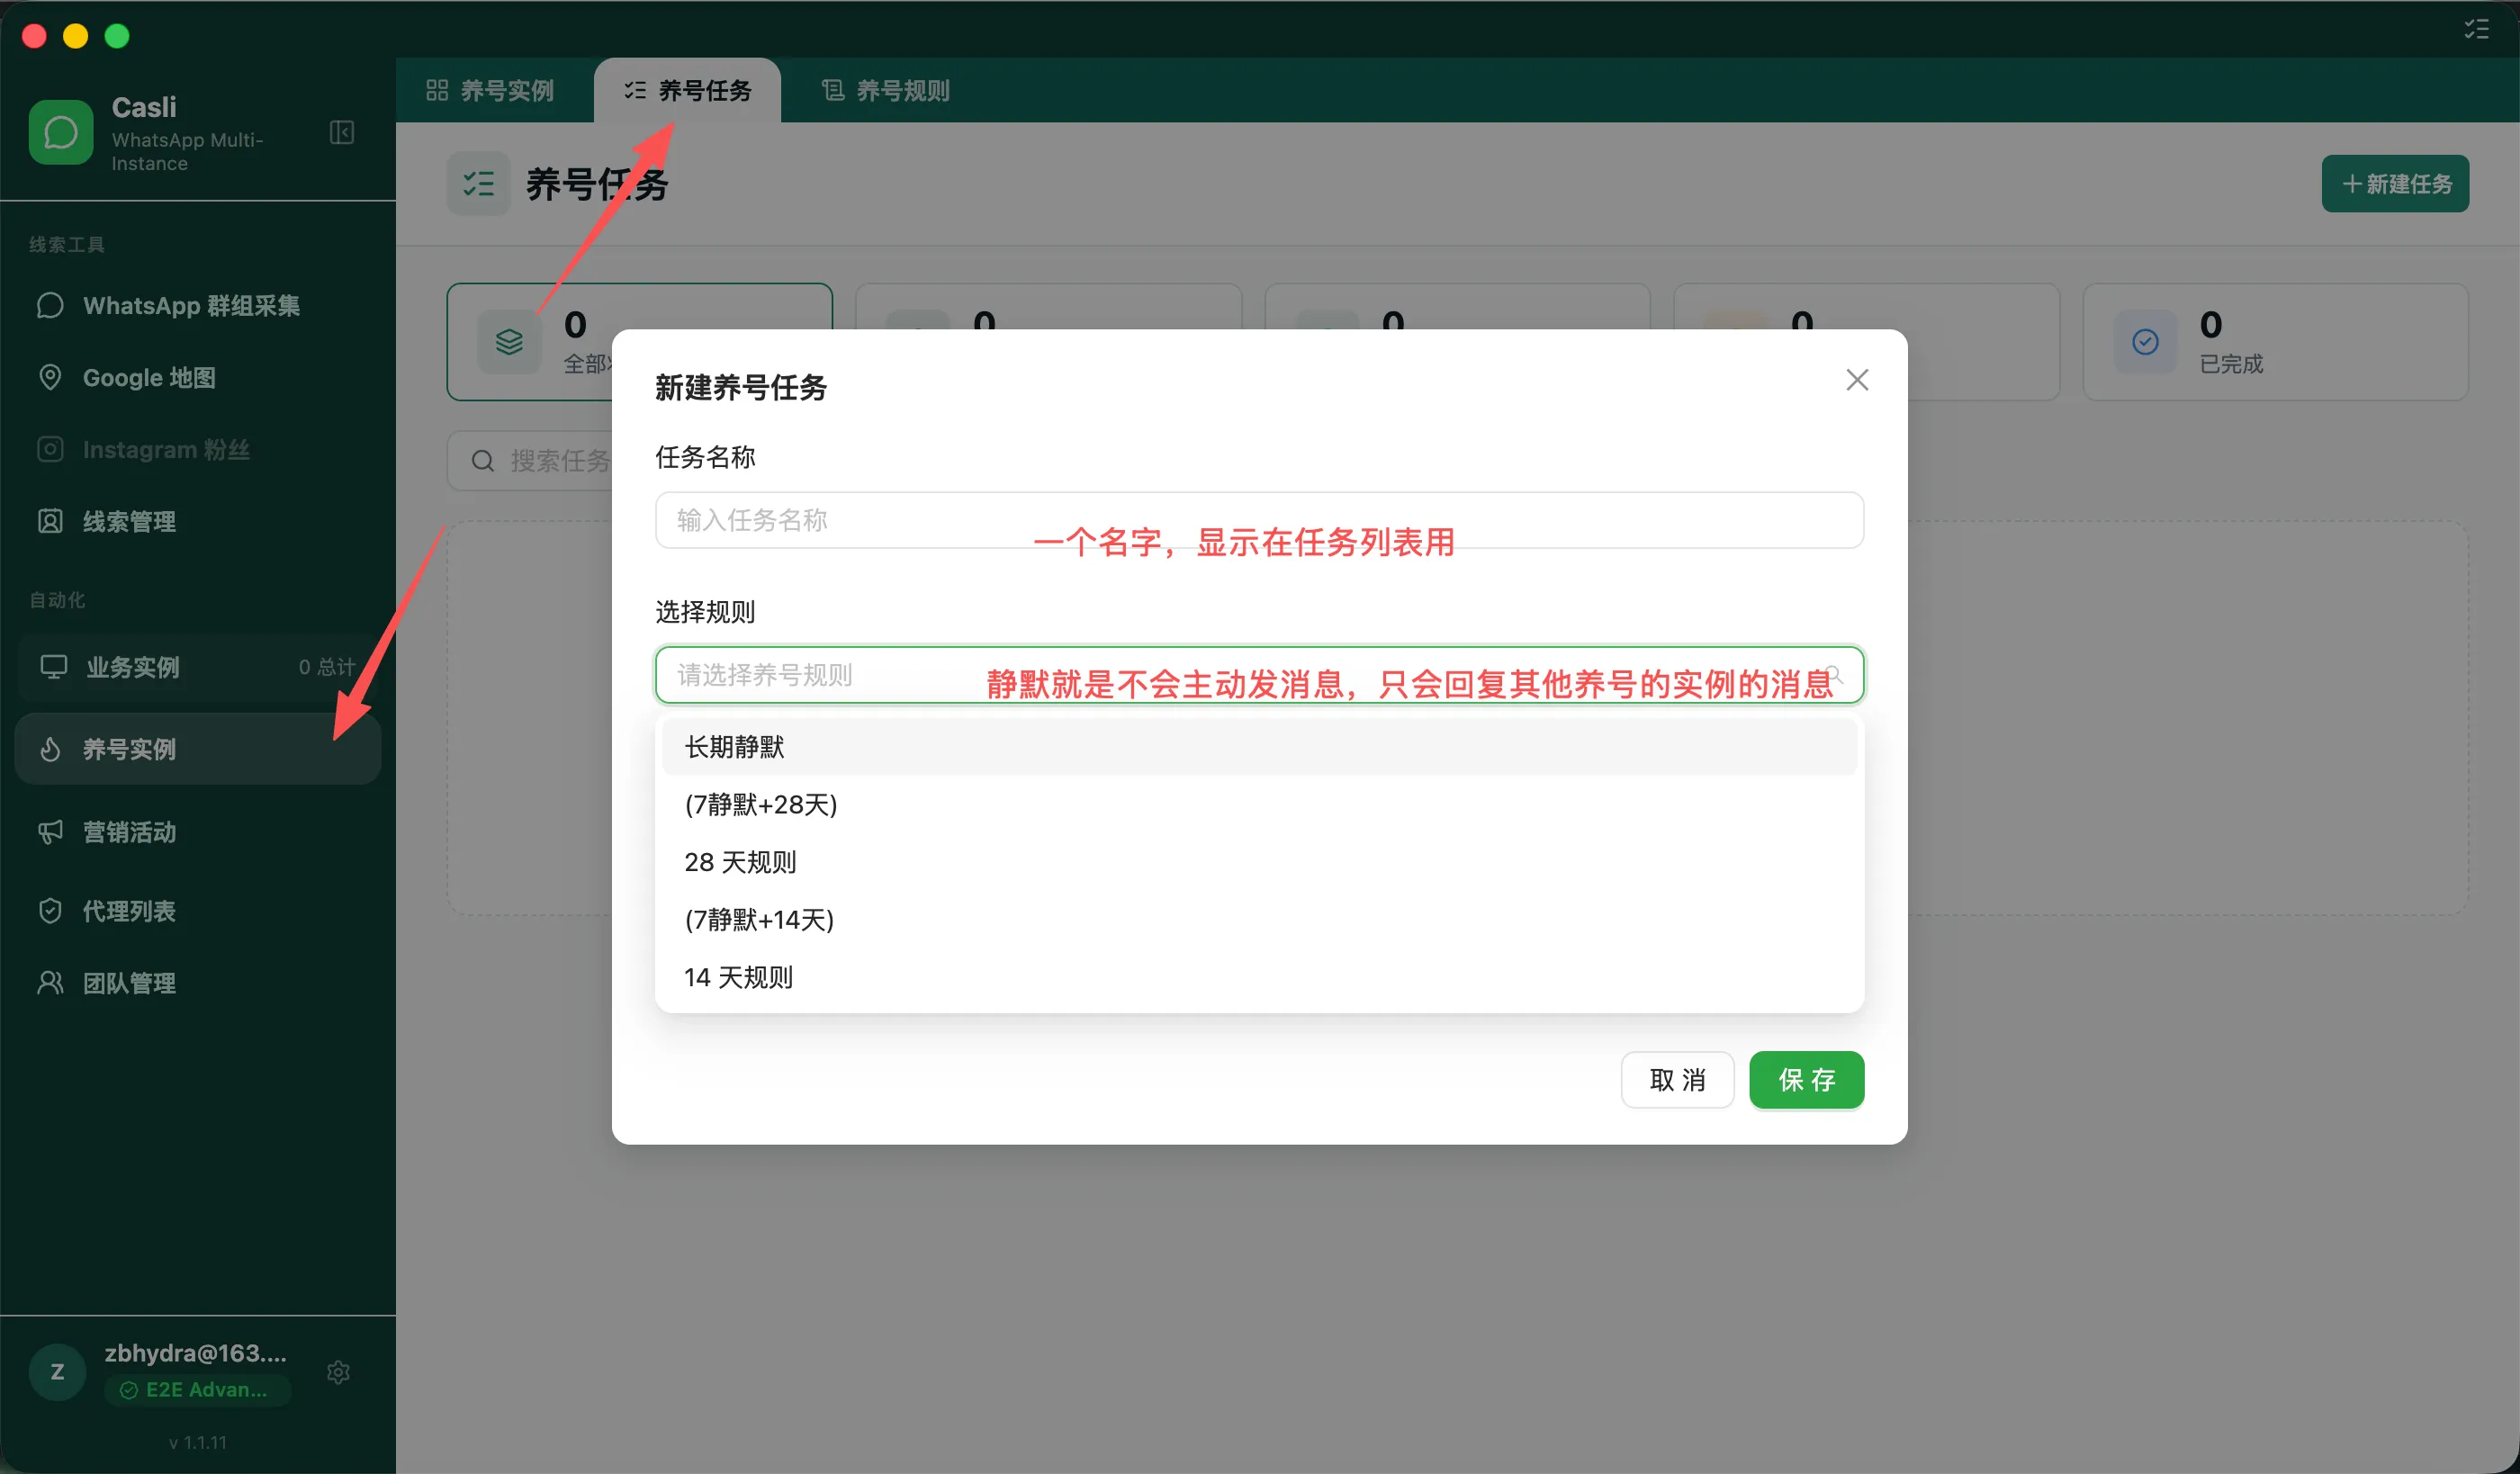
Done when: The task shows Running, and its details show the chosen execution accounts.
A running task may not send a message immediately. A silent phase, daily run window, and the availability of matching interaction accounts all affect execution. Select at least one execution account; actual interactions also require other accounts matching the selected mode. There is no fixed requirement to create two instances yourself first.
To stop temporarily, select Pause in the task list.
4.3 Change an instance’s purpose
You can move instances between business and warm-up use. Before moving one, resolve its running state and task assignments:
- Stop the instance and confirm it is no longer running, starting, awaiting login, or stopping.
- Check linked campaigns, group-join tasks, and warm-up tasks. If the instance is in use, unlink it in the indicated task. Pausing a task may not release it.
- Select the instance in its list, choose Move to Warmup or Move to Business, and confirm.
- Check the destination list for the instance, then start it if needed.
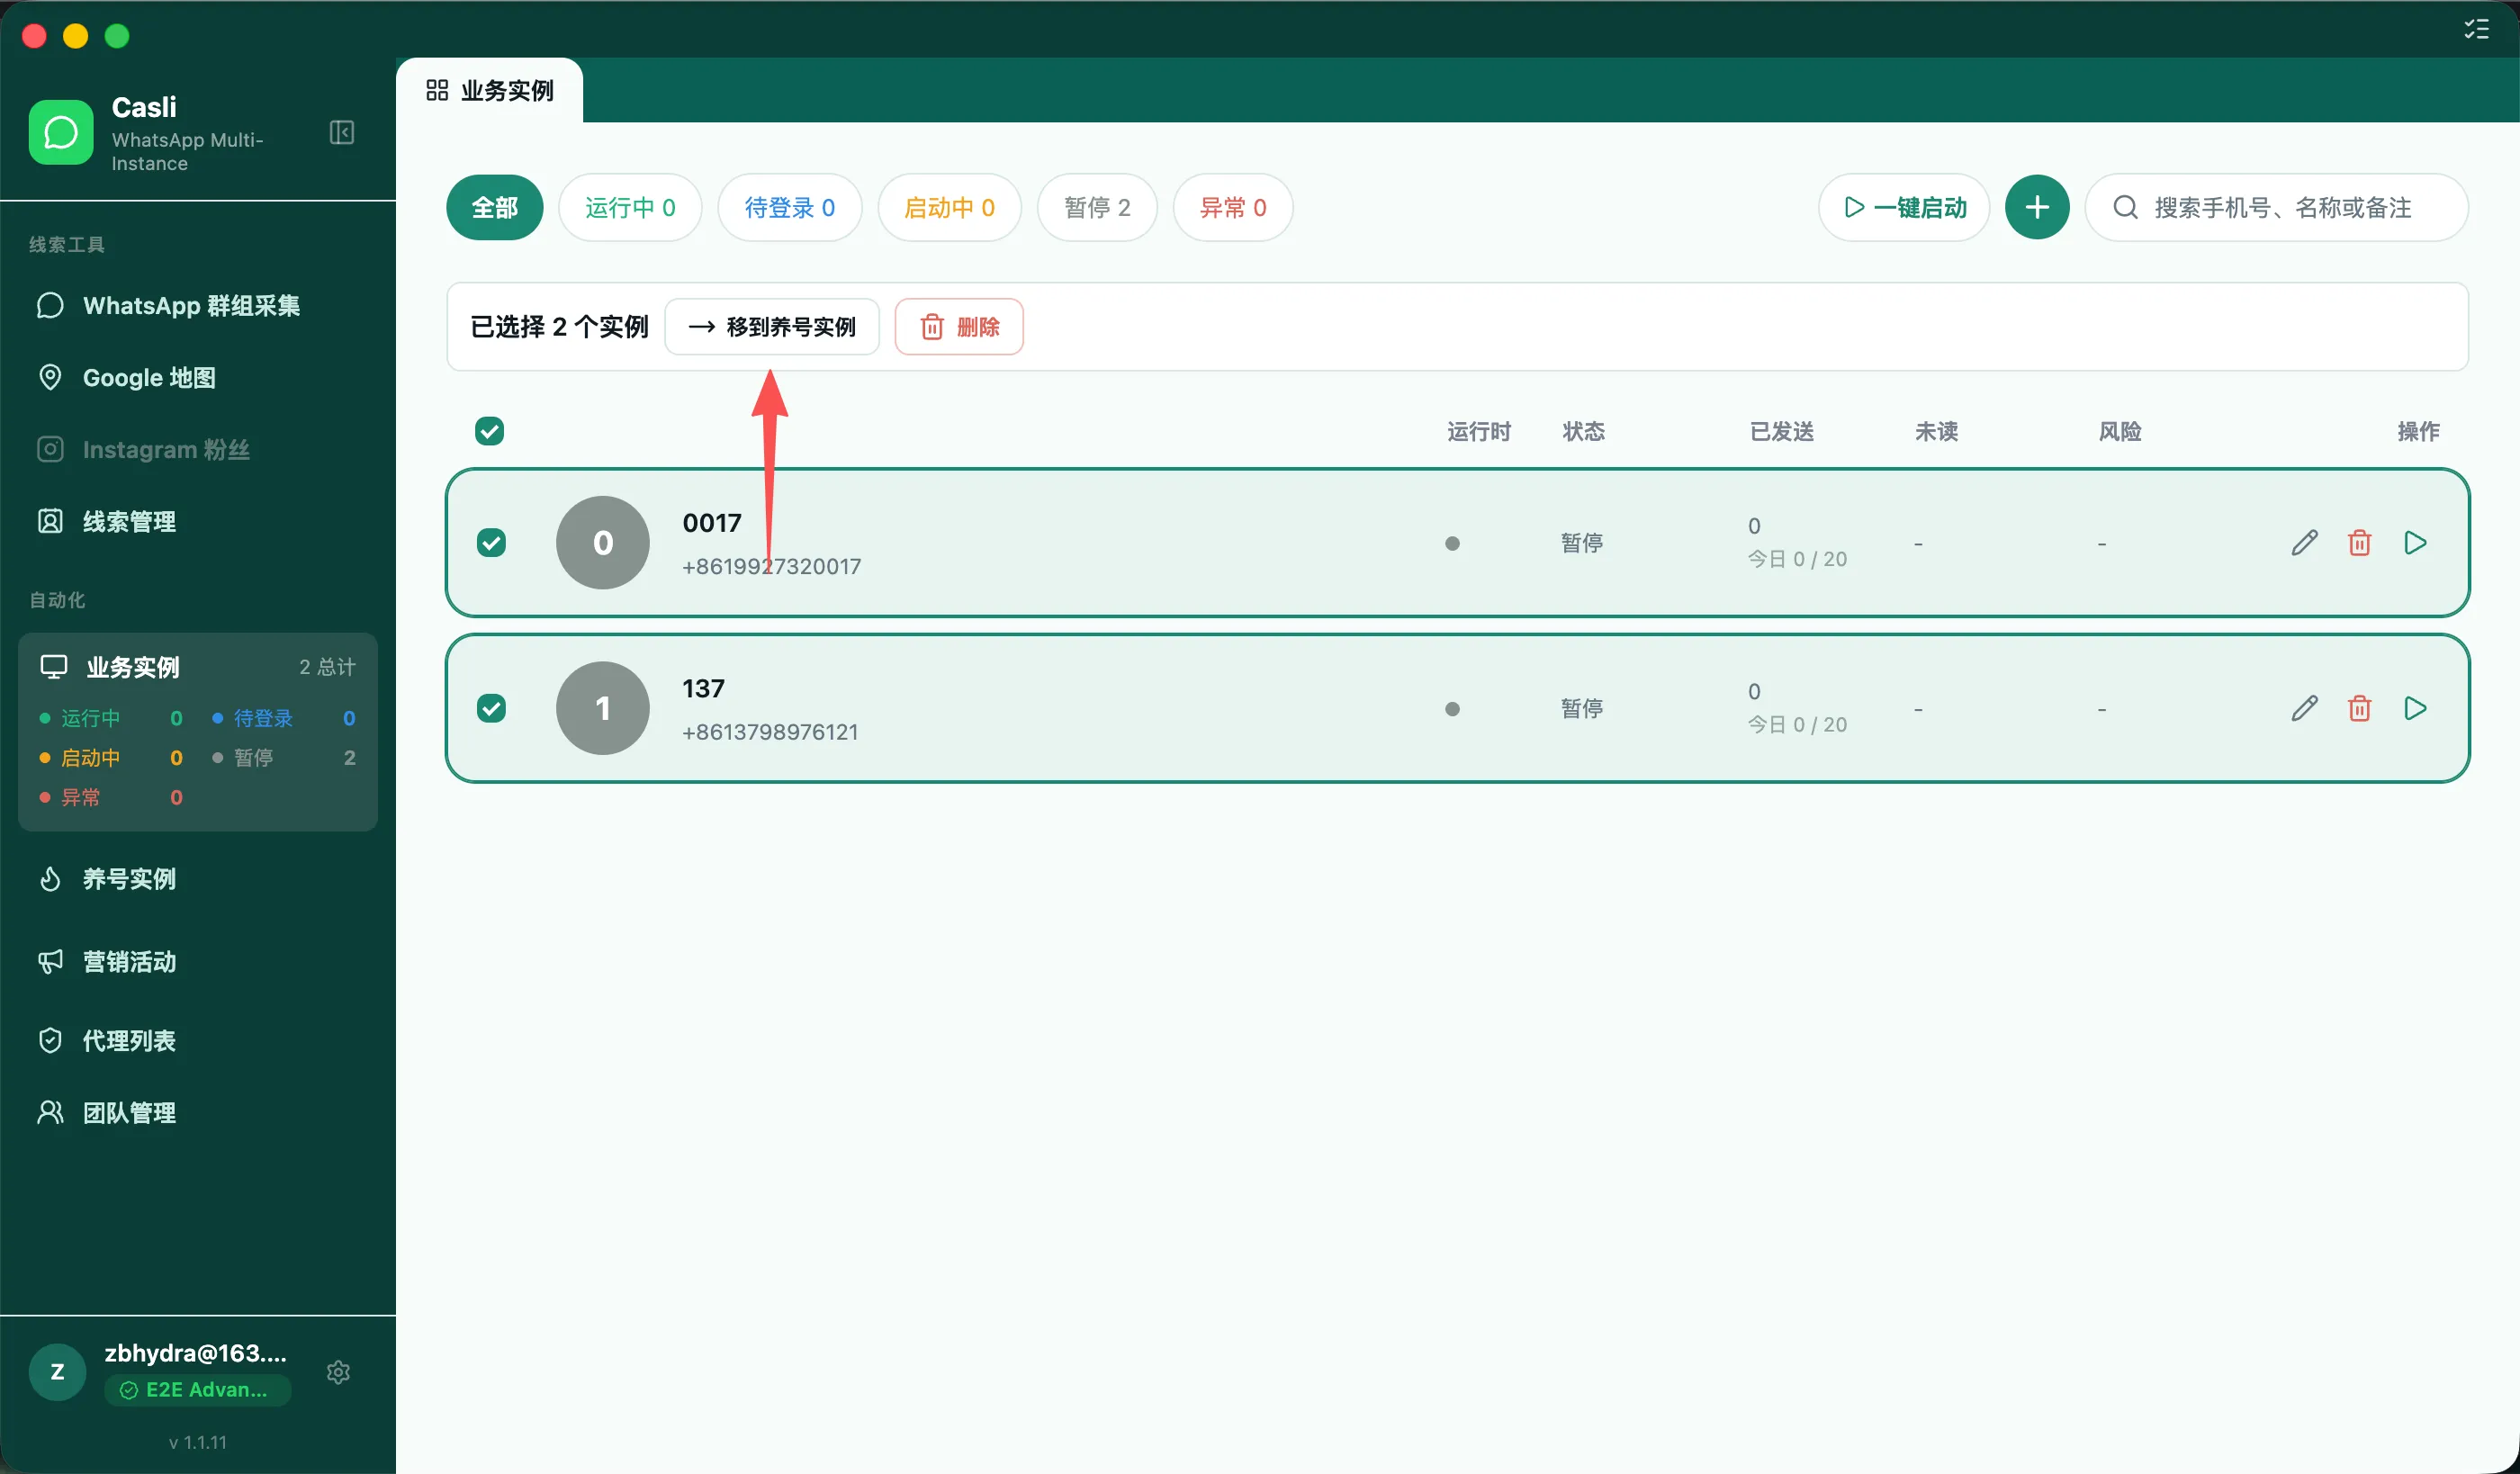
Done when: The instance appears in the destination list.
If you need to delete a task to release an instance, first confirm that you no longer need the task. Deletion cannot be undone. Do not delete the instance just to move it.
5. Collect and manage leads
Choose either route according to your needs:
- Google Maps: Search for businesses → import contact details → check them in Lead Management.
- WhatsApp groups: Search for groups → join with a logged-in instance → import member details into Lead Management.
If you already have contacts, you can add them manually or import a CSV in the campaign recipients step.
5.1 Collect leads from Google Maps
- Open Google Maps in the sidebar.
- Enter a keyword and area to search, such as your target industry and city, then search.
- Review the results for businesses relevant to your work.
- Use the import control at the top right and follow the prompts to import results into Lead Management.
- Open Lead Management and check the new details and phone numbers.
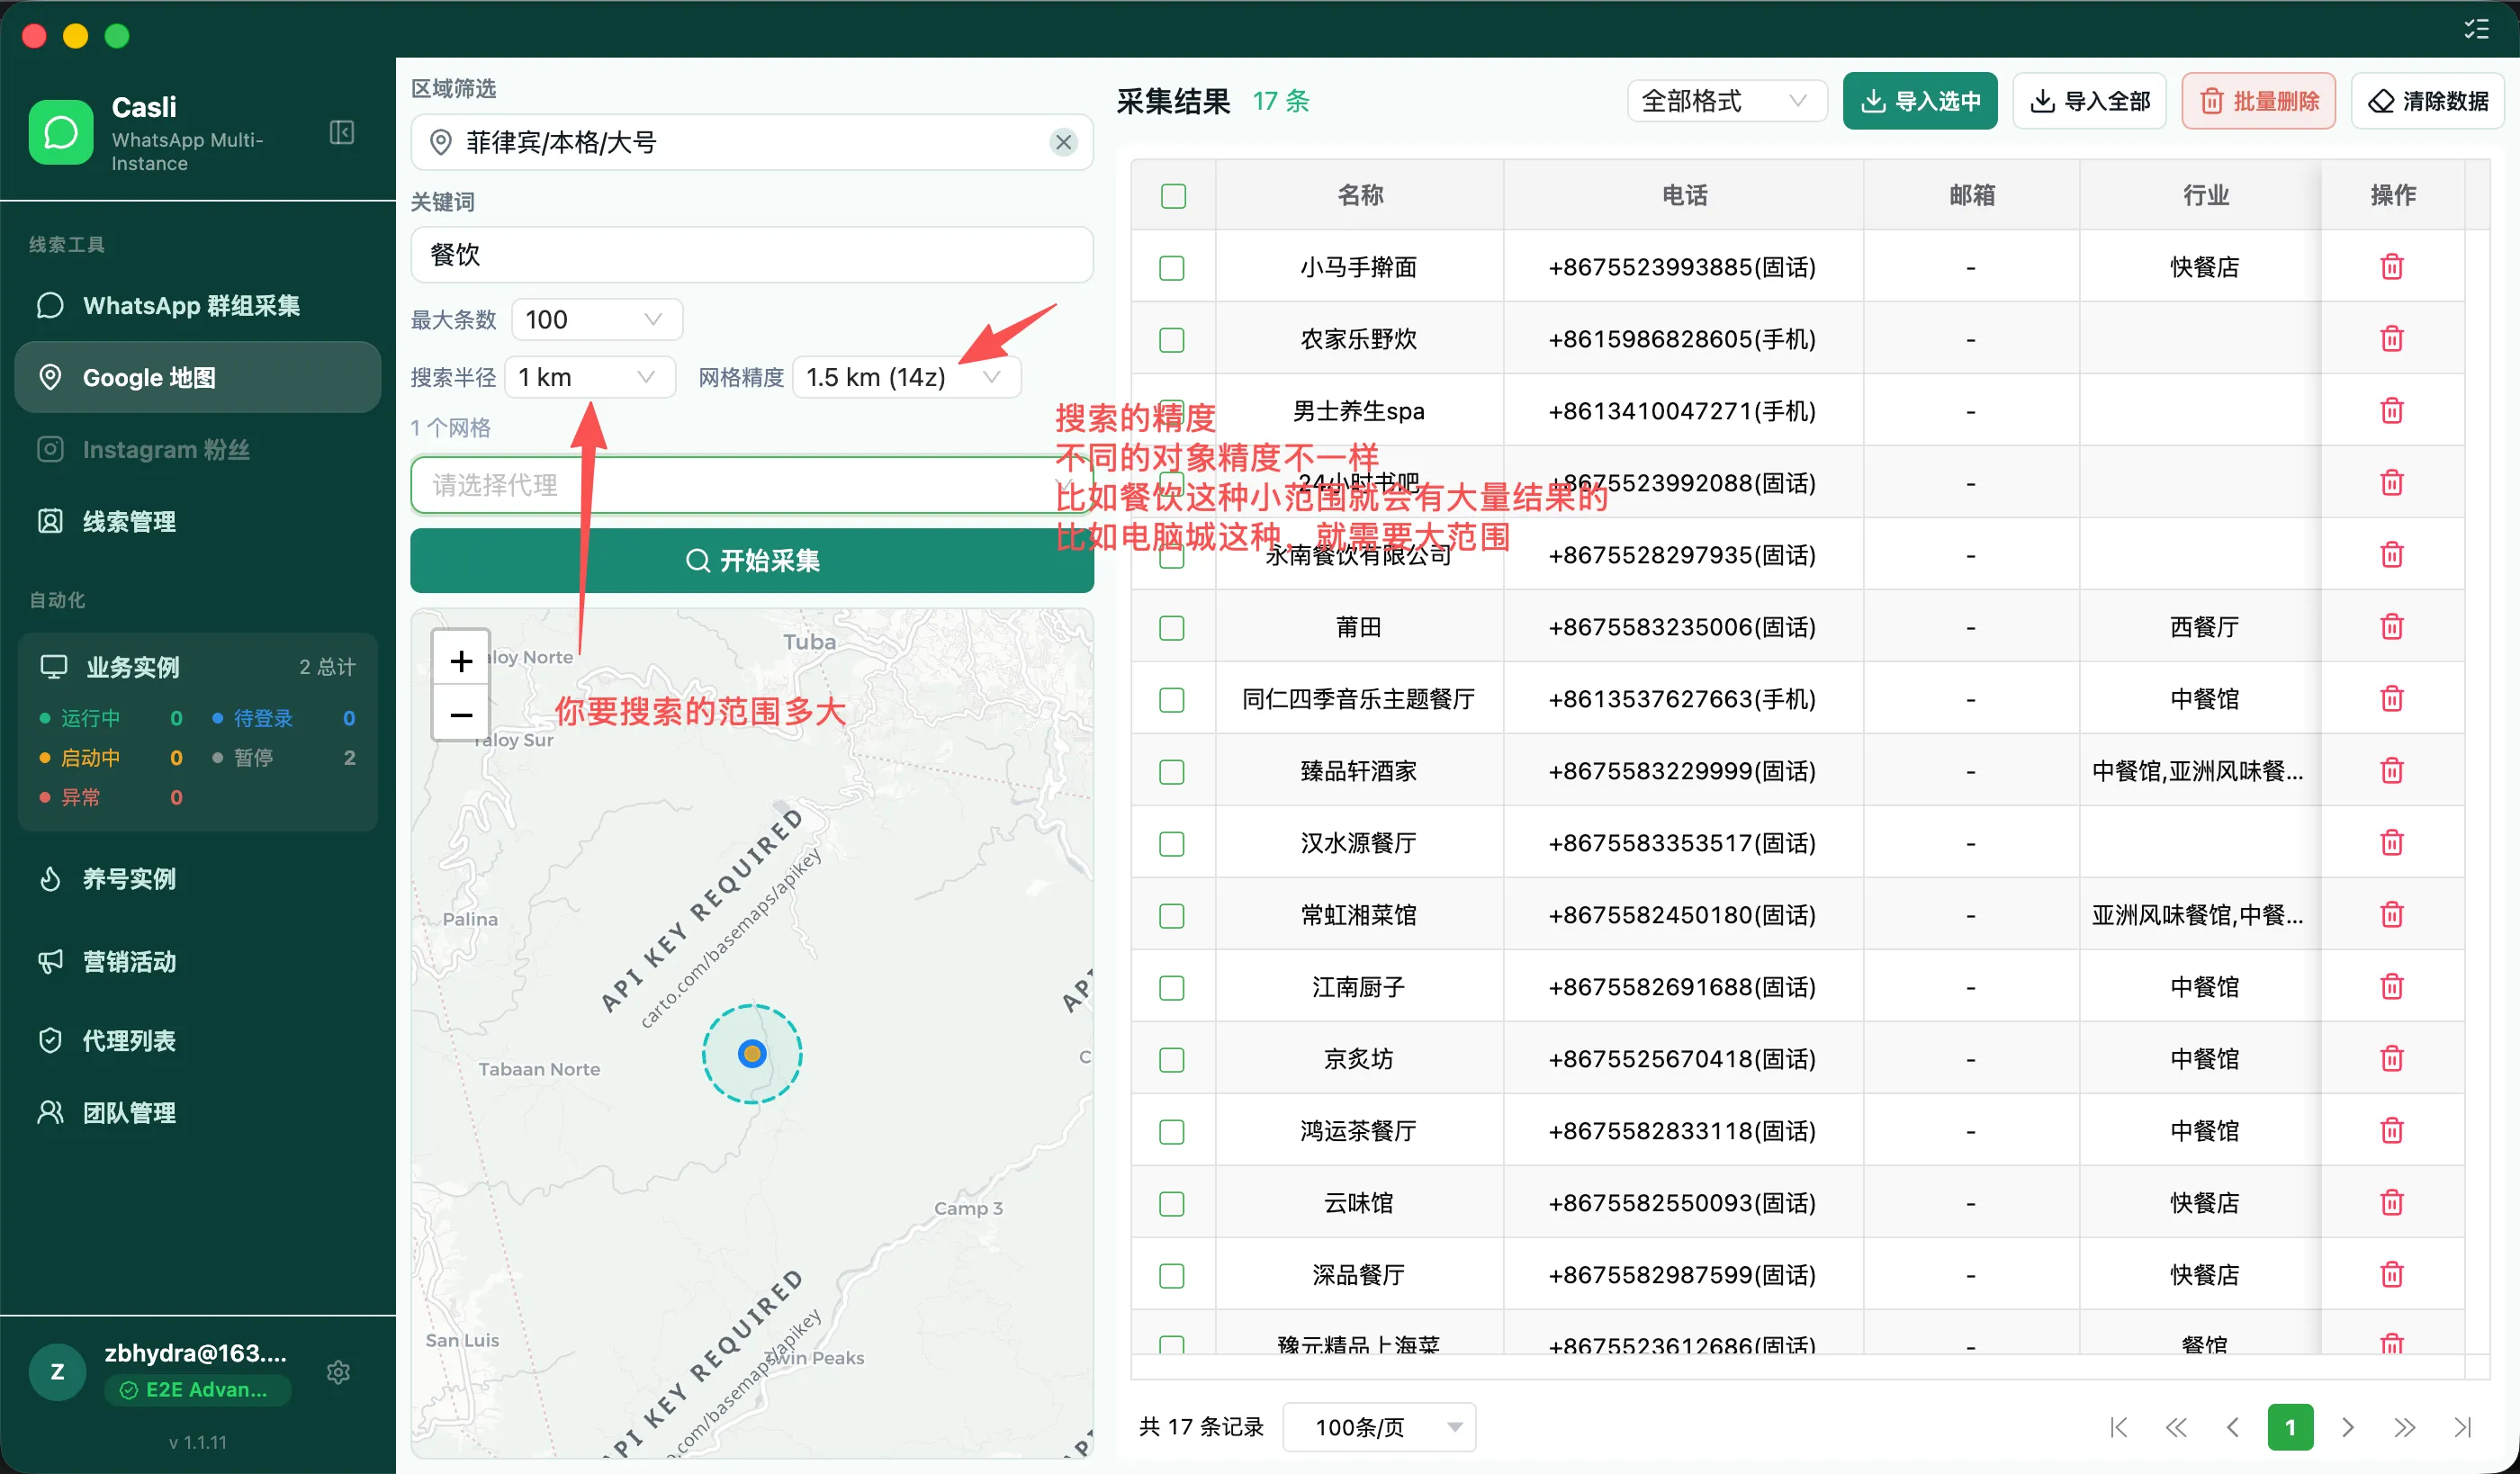
Done when: You can find the imported contact details in Lead Management.
A business on the map may have no public phone number. Even a mobile number may not be registered on WhatsApp. Do not treat the number of search results as the number of people you can message.
5.2 Collect leads from WhatsApp groups
Before you begin: Have a logged-in, running business instance ready to join a group and read member details.
-
Open WhatsApp Group Scrape in the sidebar, enter your search criteria, and search.
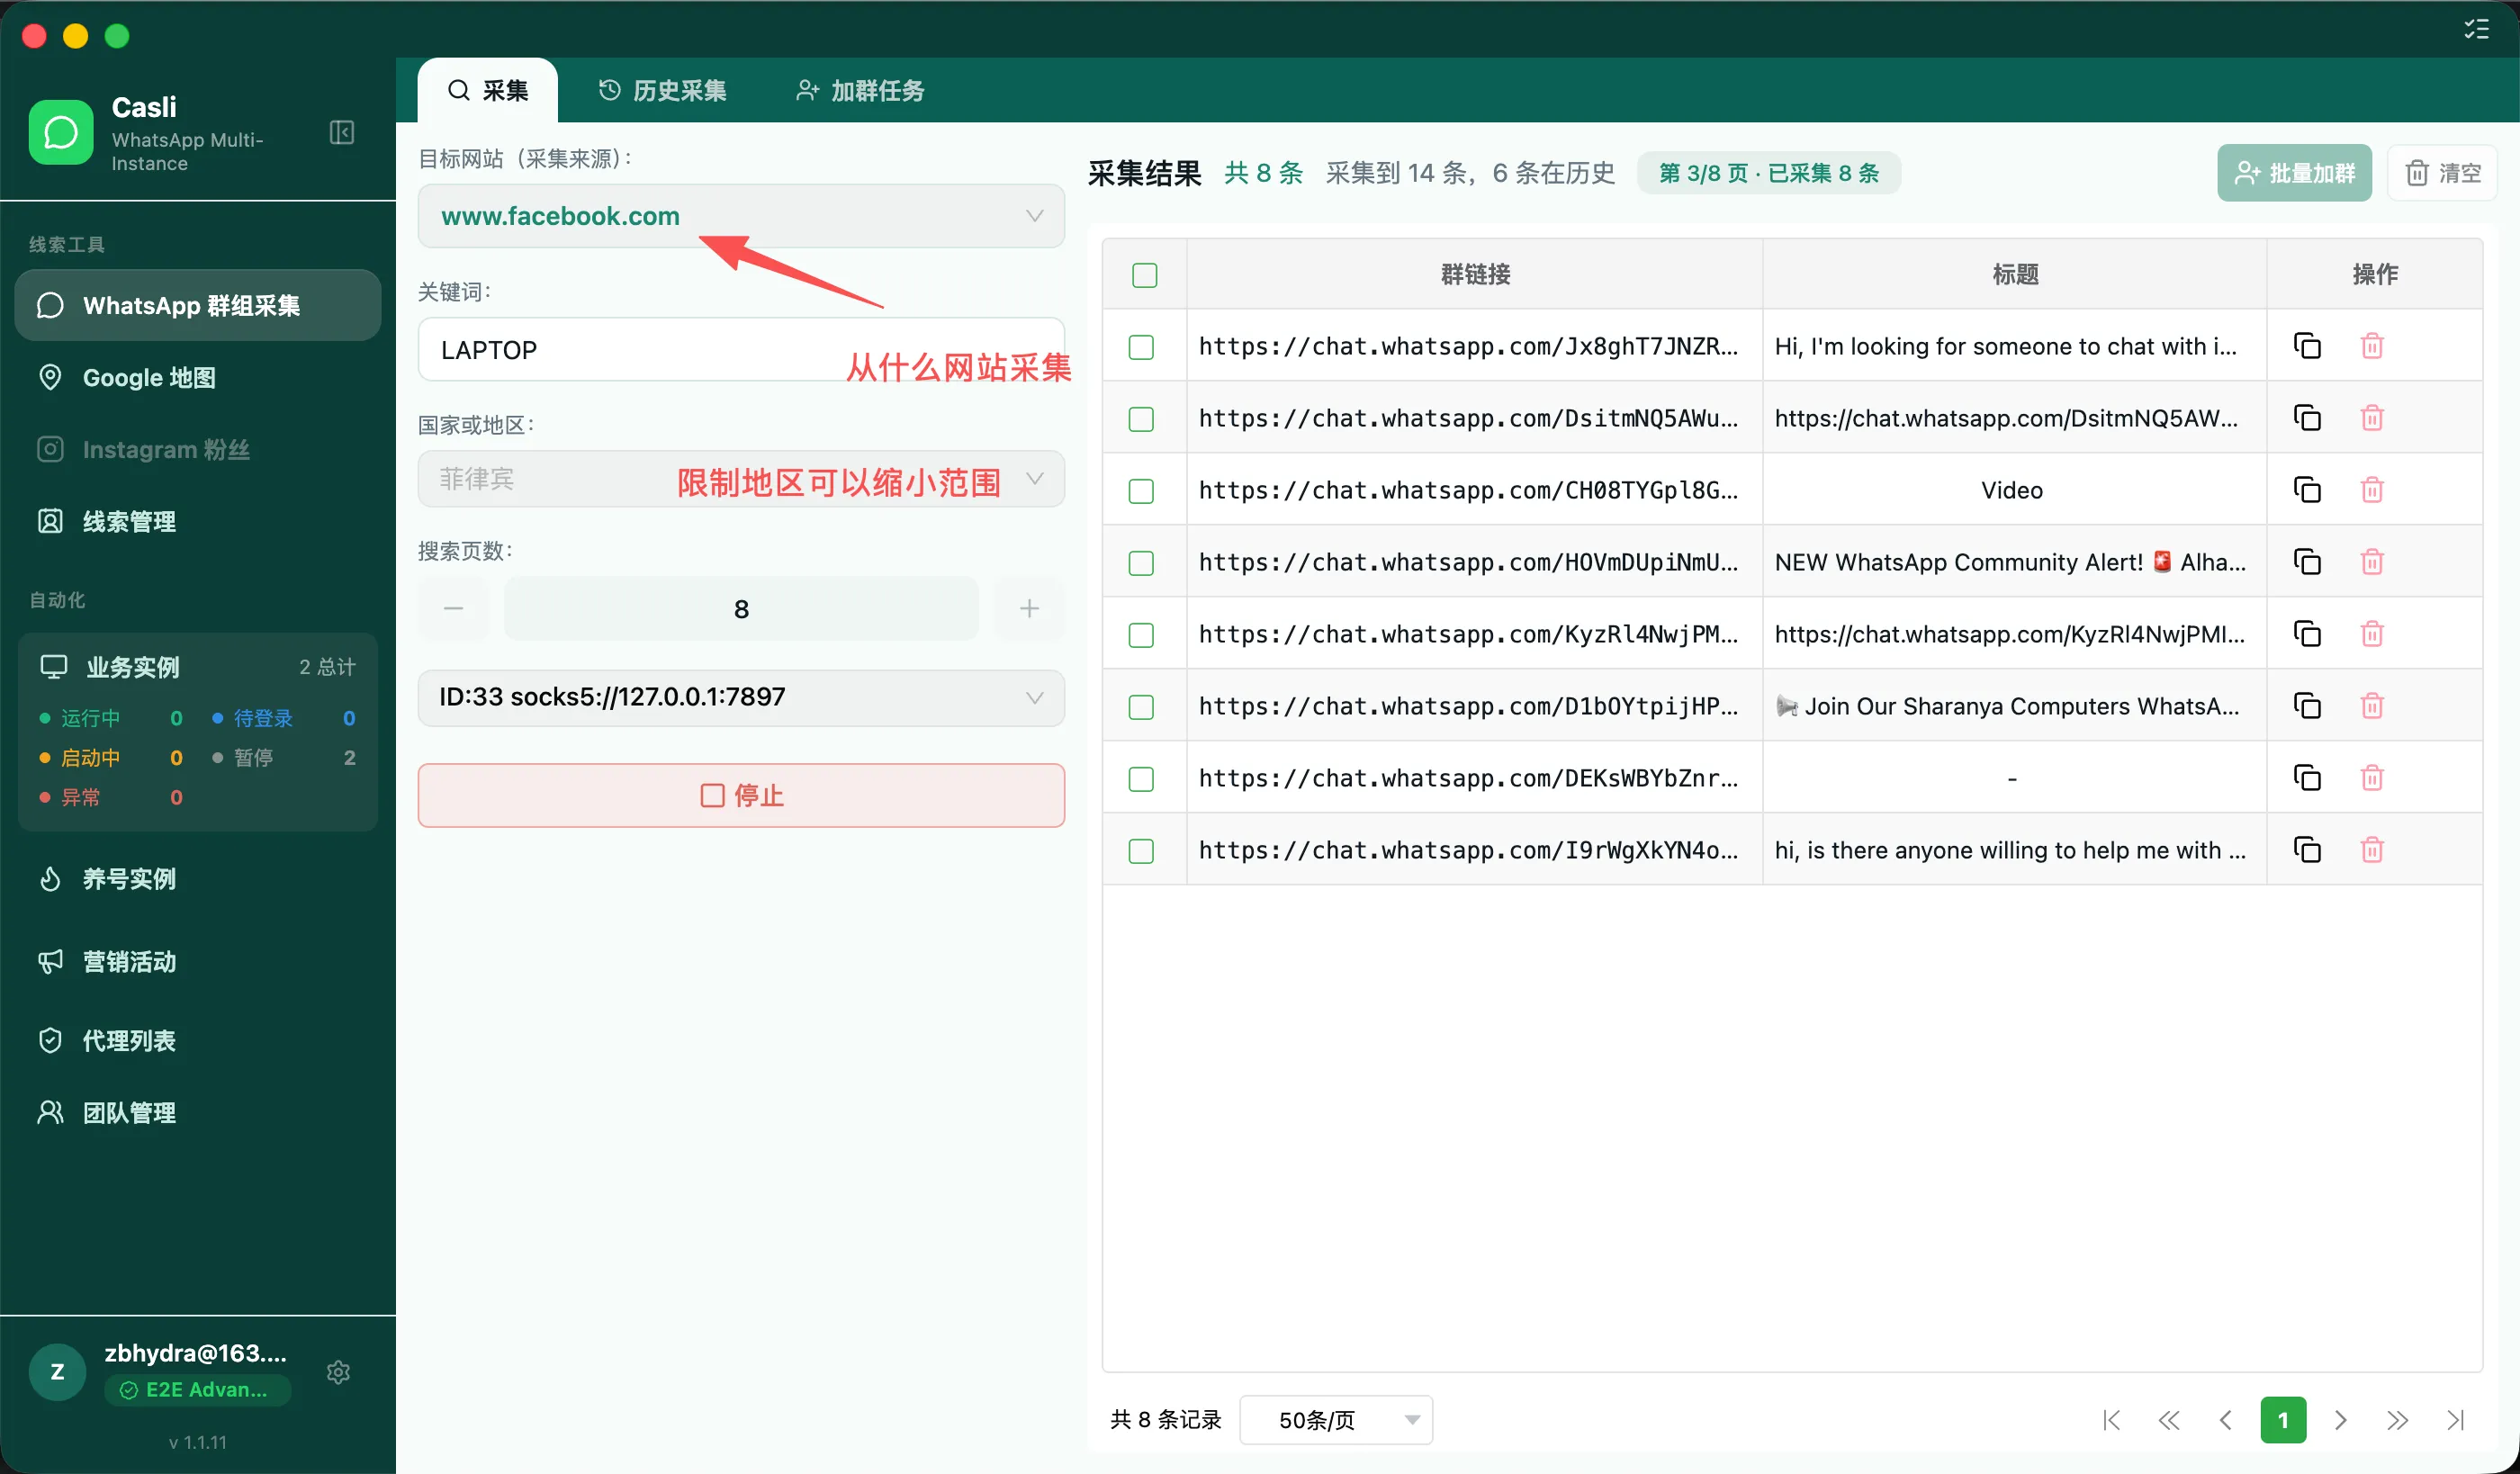
-
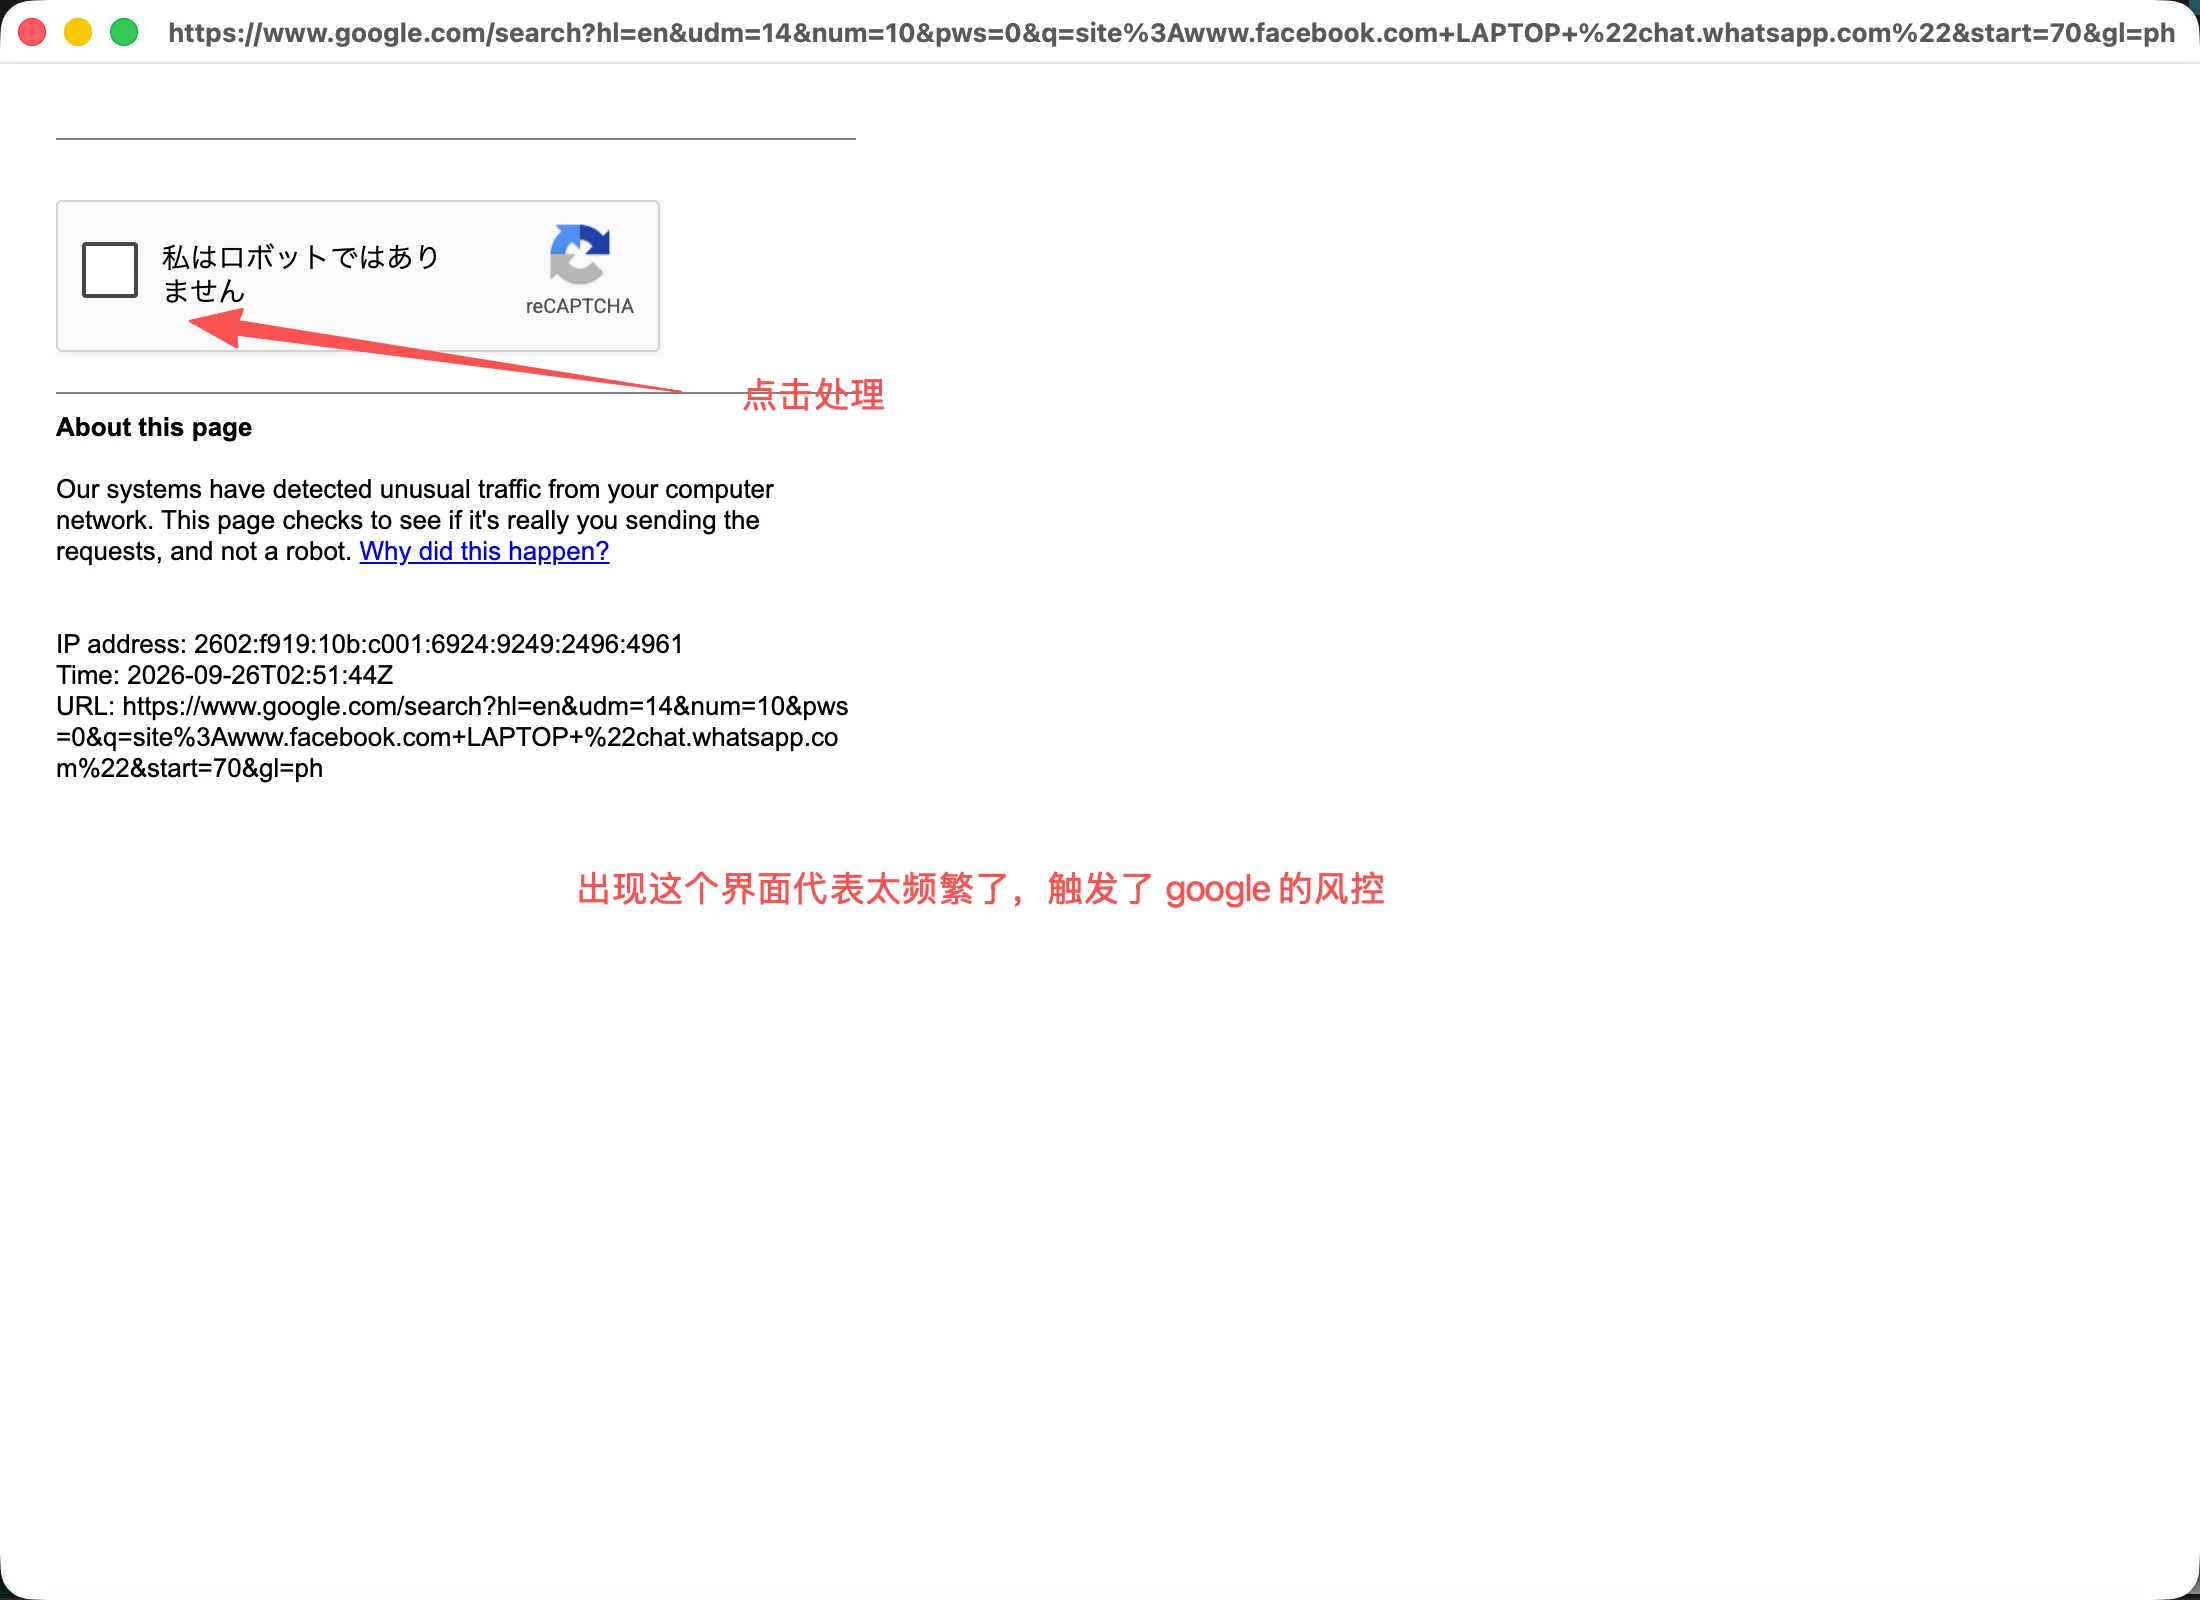
If Google verification appears, complete it manually as instructed, then continue.
-
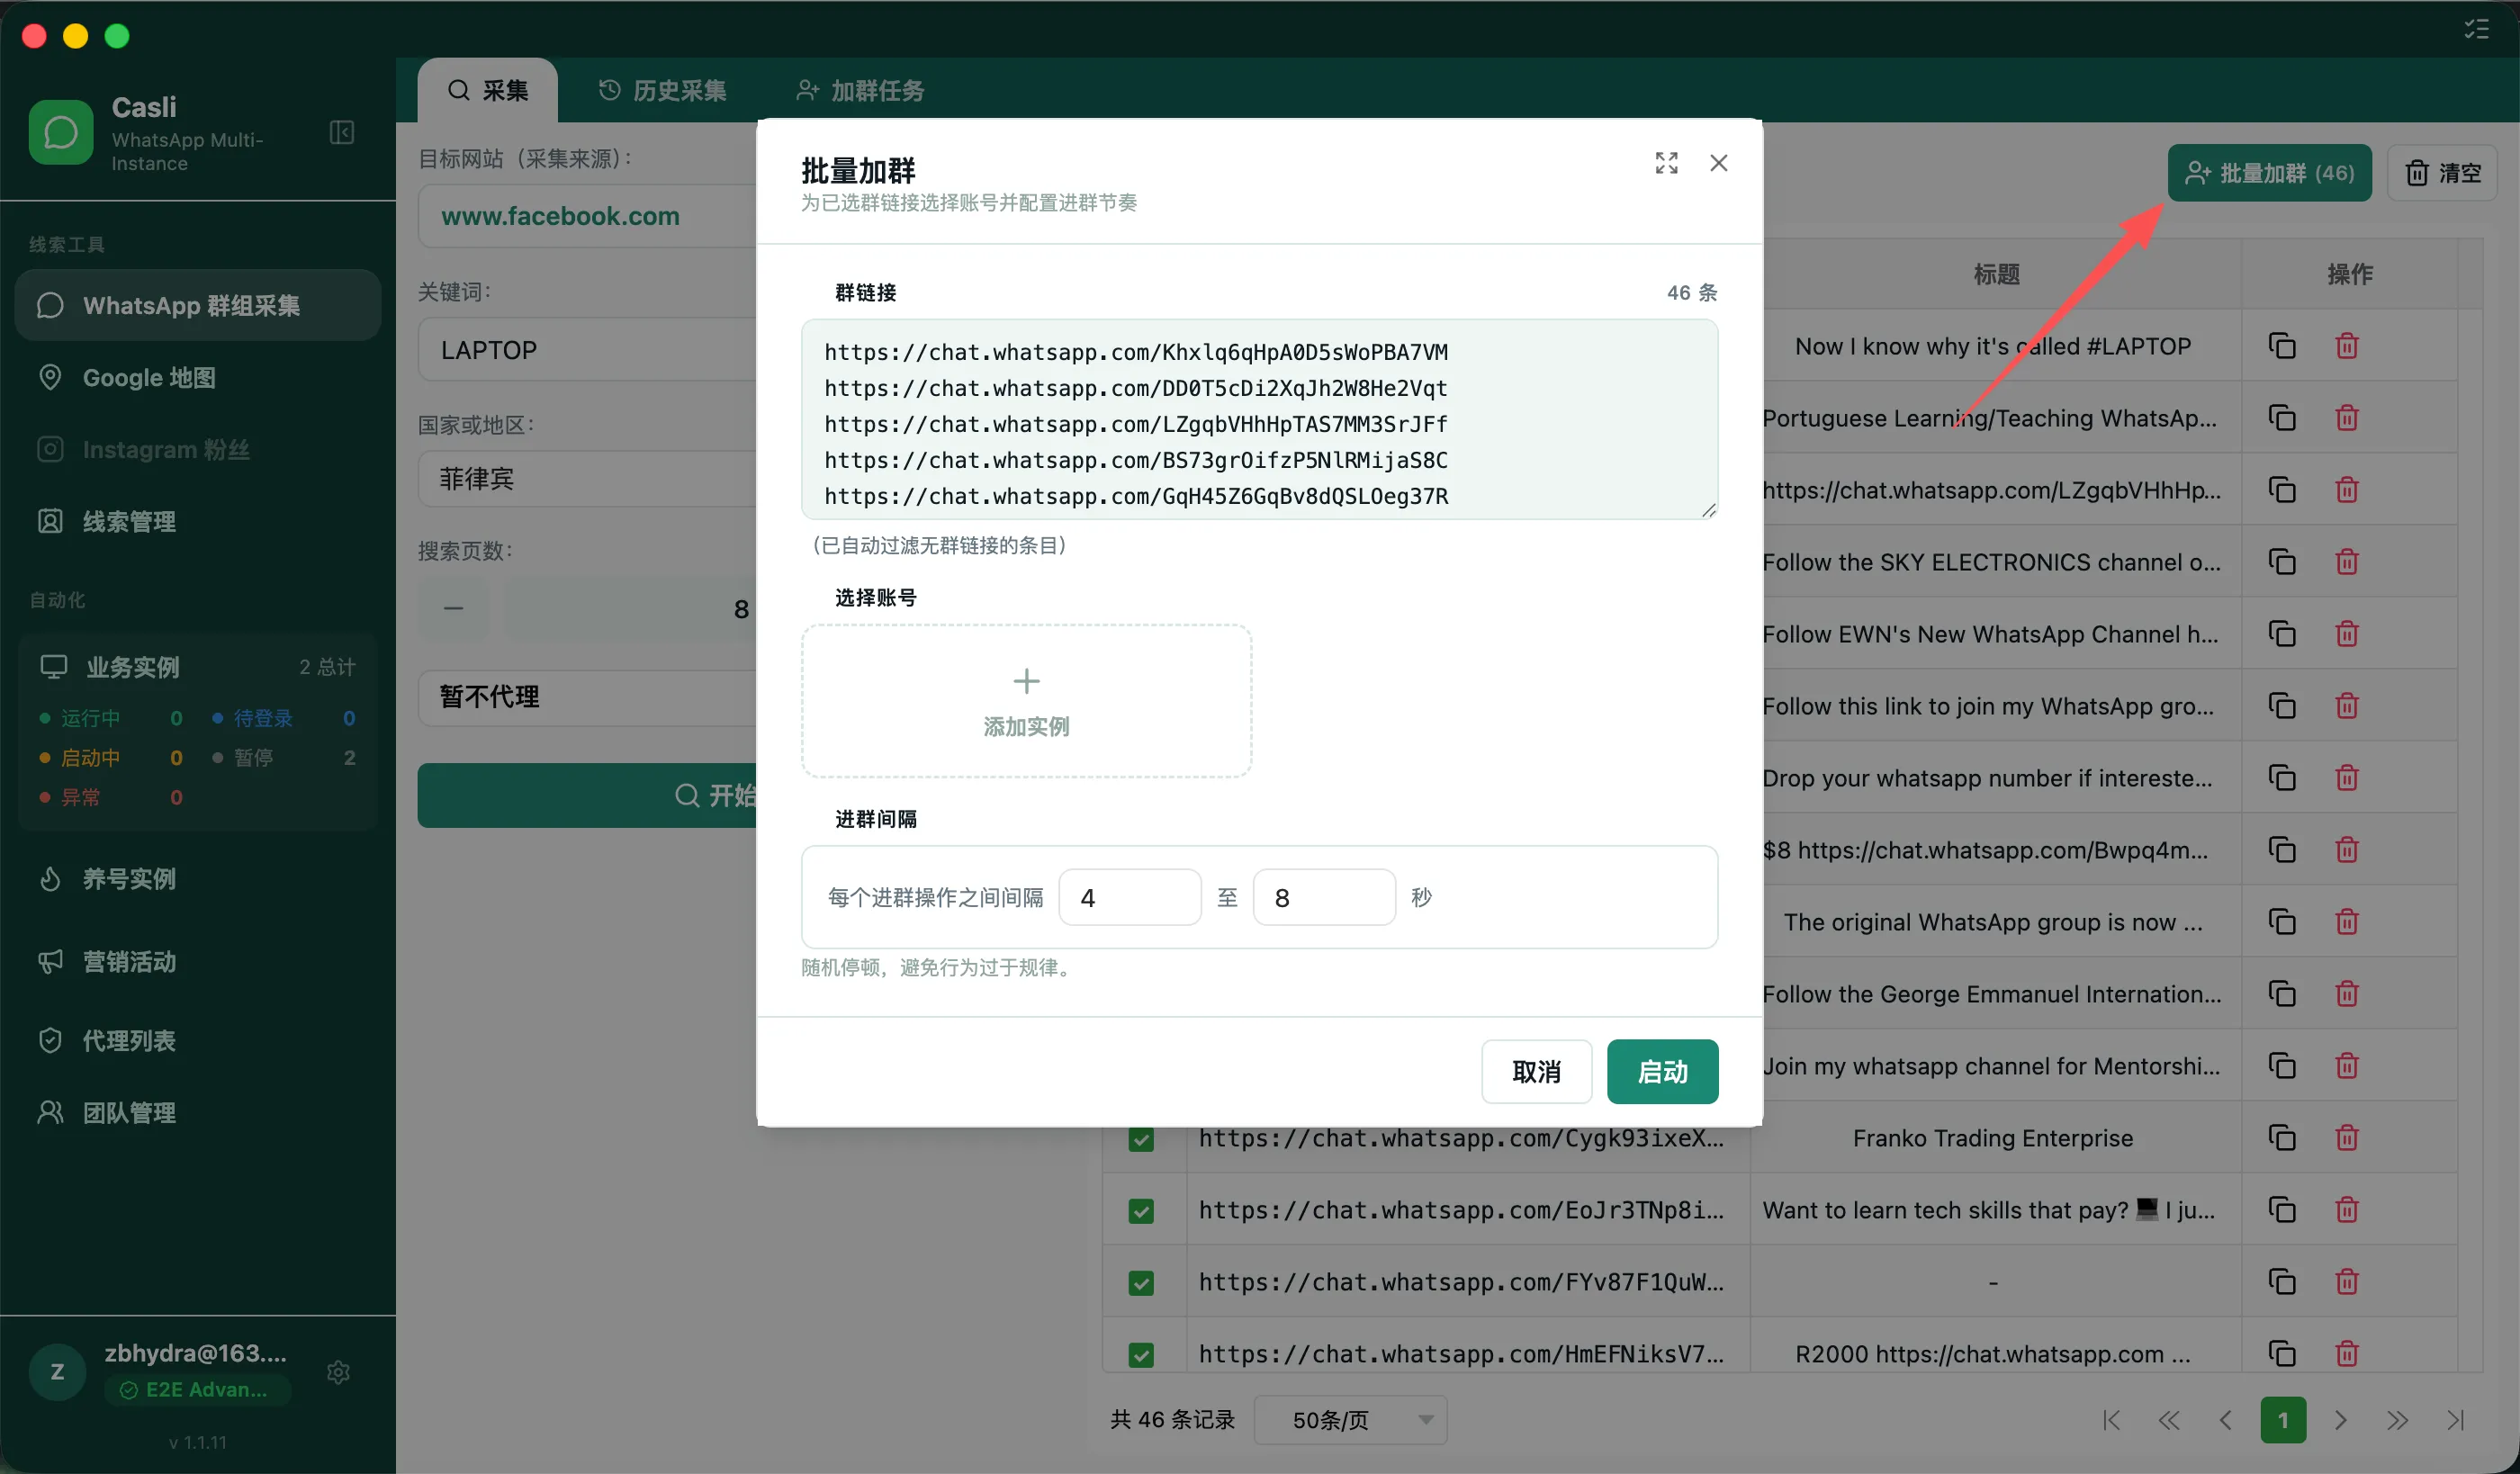
Select the groups to join and use an online instance for the join action. Check the result and confirm that joining succeeded before continuing.
-
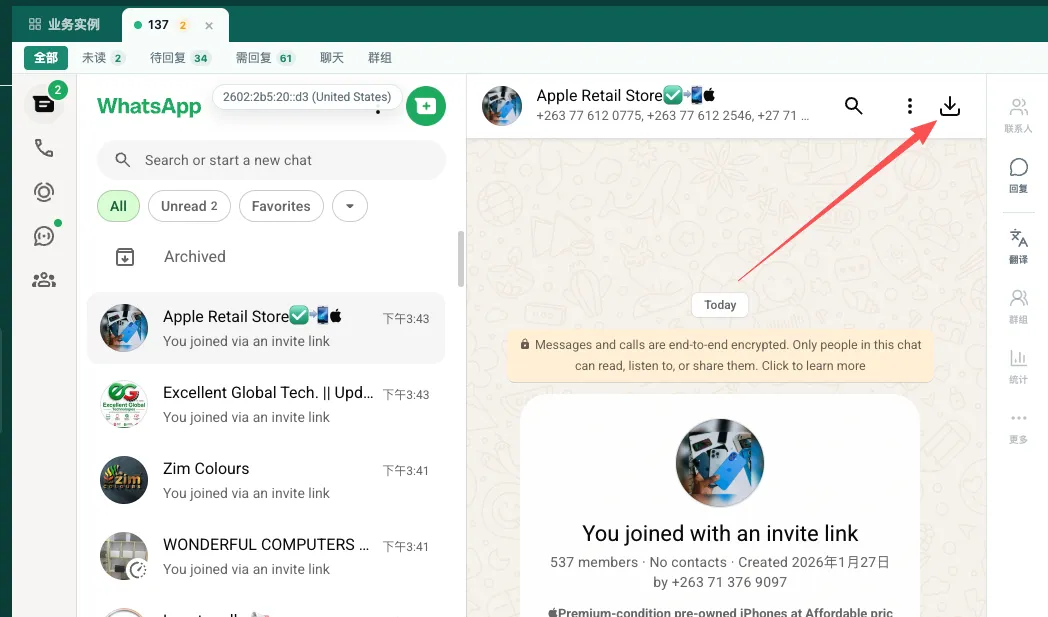
Switch to the instance that joined and open its group-member export control.
-
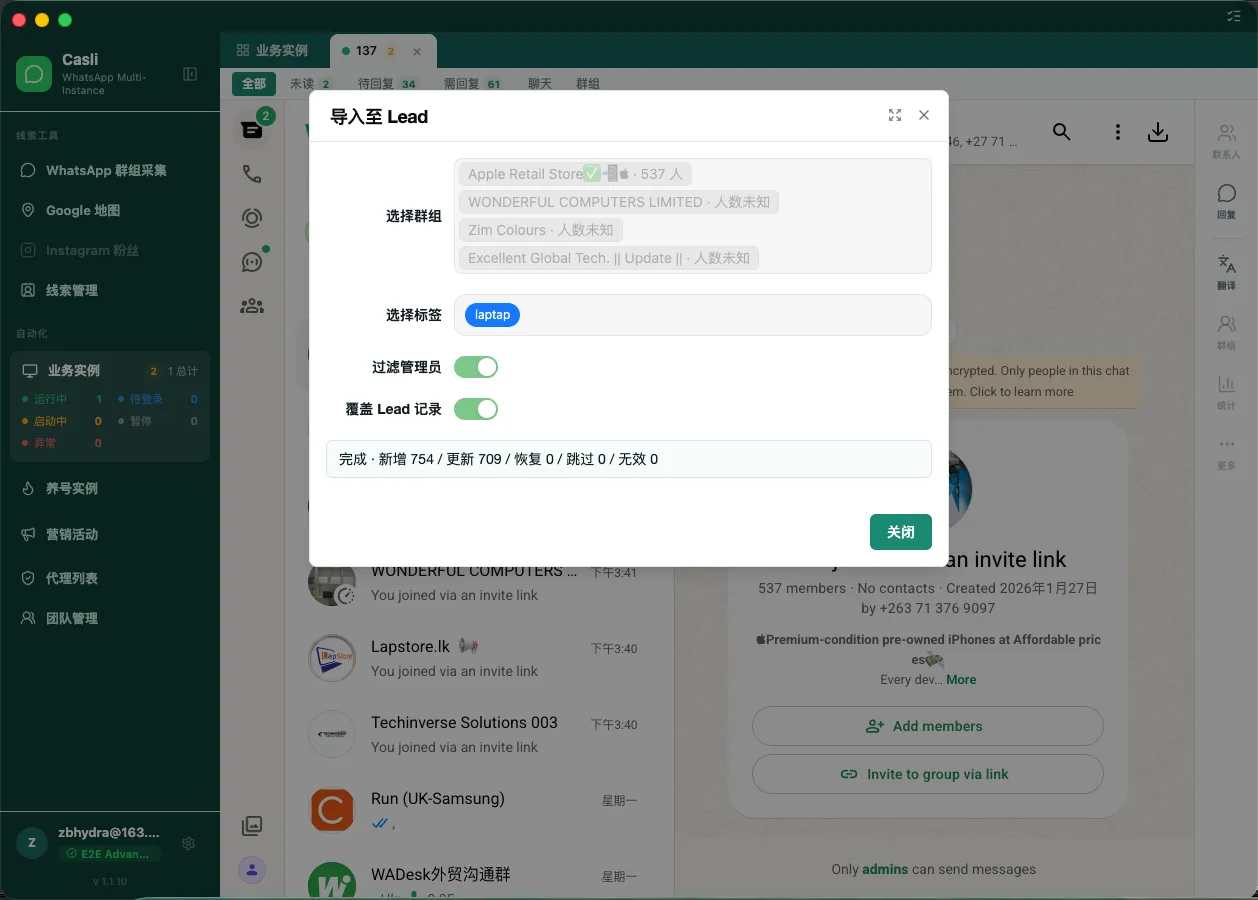
In Import to Lead, choose the group, check tags, administrator filtering, and record-overwrite options, then select Import. “Lead” means contact lead here.
-
Wait for the import result. Review added, updated, skipped, and invalid counts, then check Lead Management.
Done when: Import has finished and the relevant details appear in Lead Management. If some records failed, read the notice instead of assuming the whole batch was imported.
5.3 Check your leads
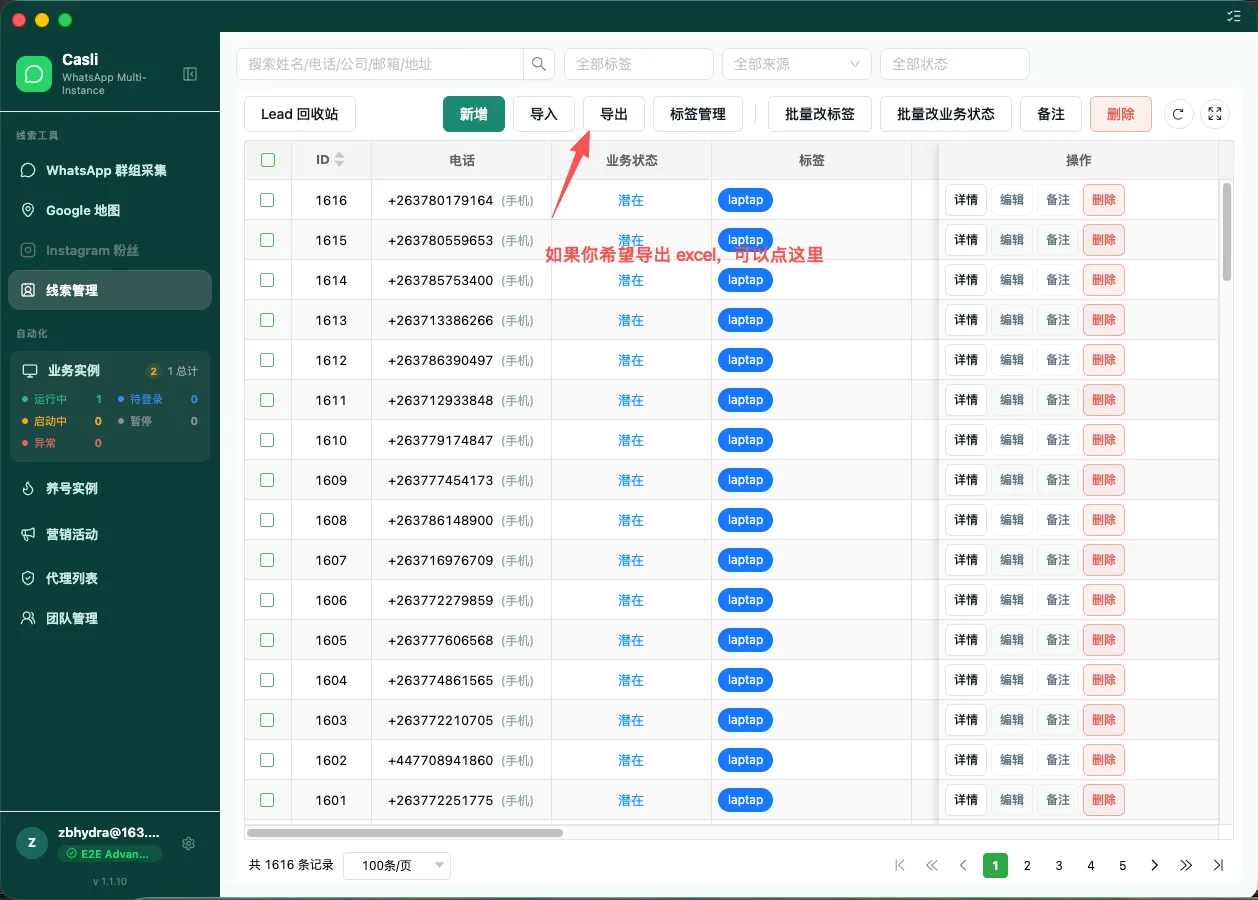
Before sending, check at least:
- Whether the contacts belong to the batch you plan to use.
- Whether numbers and country codes are correct and details complete.
- Whether you have useful tags to distinguish batches or sources when needed.
Done when: You can identify exactly which contacts this campaign will use. Importing leads does not itself send a message.
6. Run your first bulk messaging campaign
Before you begin: We recommend completing account warm-up, checking for account warnings or restrictions, then moving the sending instance to business use and starting it. Prepare a small group of test recipients and a reviewed message. Do not start bulk messaging with a newly logged-in account that has not been warmed up.
6.1 Create a campaign and select sending accounts
- Open Campaign in the sidebar and select New Campaign.
- Enter a campaign name, such as “First sending test.”
- Under Instances, select the business instance that will send, then select Next.
- If another campaign occupies the instance, resolve that campaign or choose another available instance.
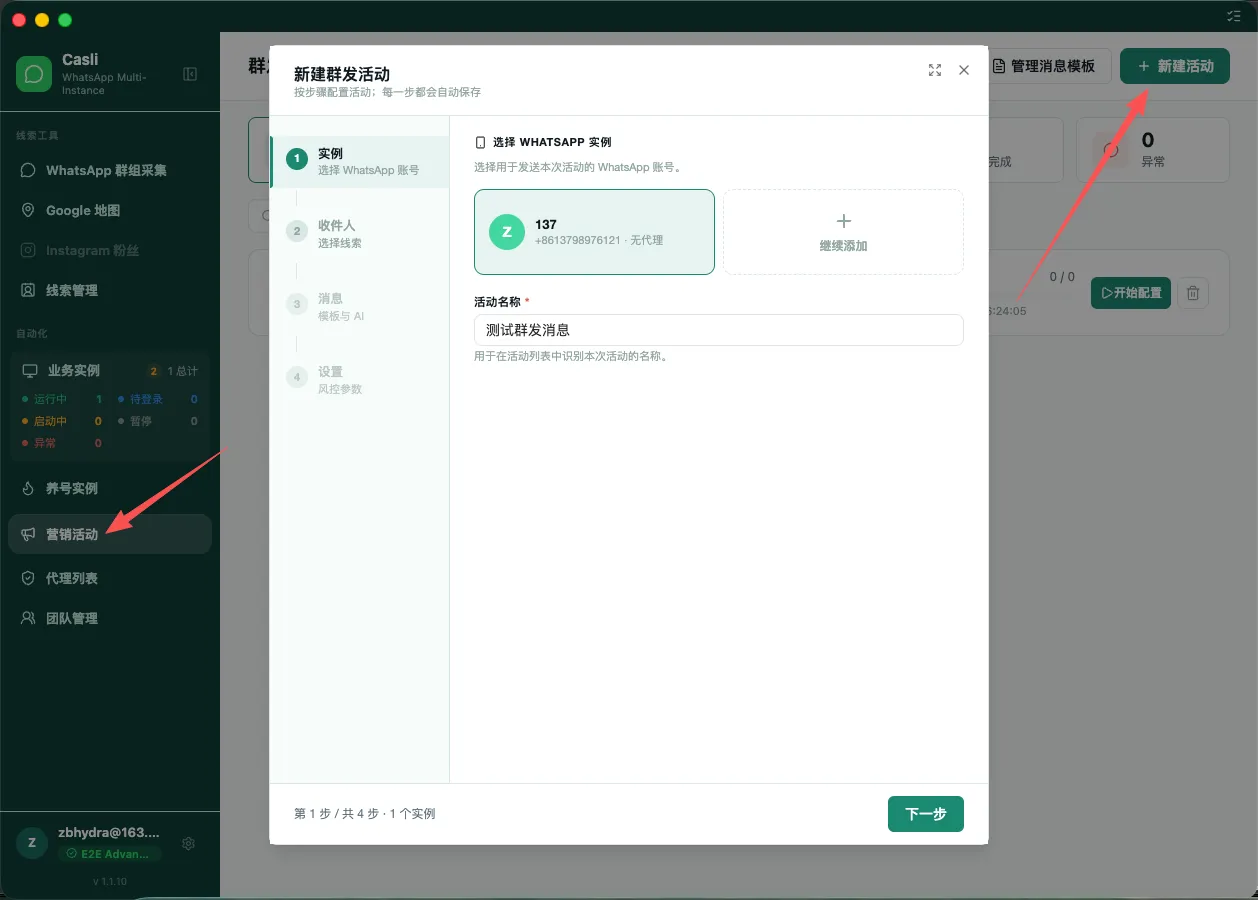
Done when: The correct sending instance is selected in the configuration.
6.2 Select recipients
- Under Recipients, choose a source: leads, manual entry, or CSV import.
- Follow the prompts to add the numbers for this campaign. If using leads, confirm the filter scope and selected records.
- Check the recipient count and make sure no other batch was included before continuing.
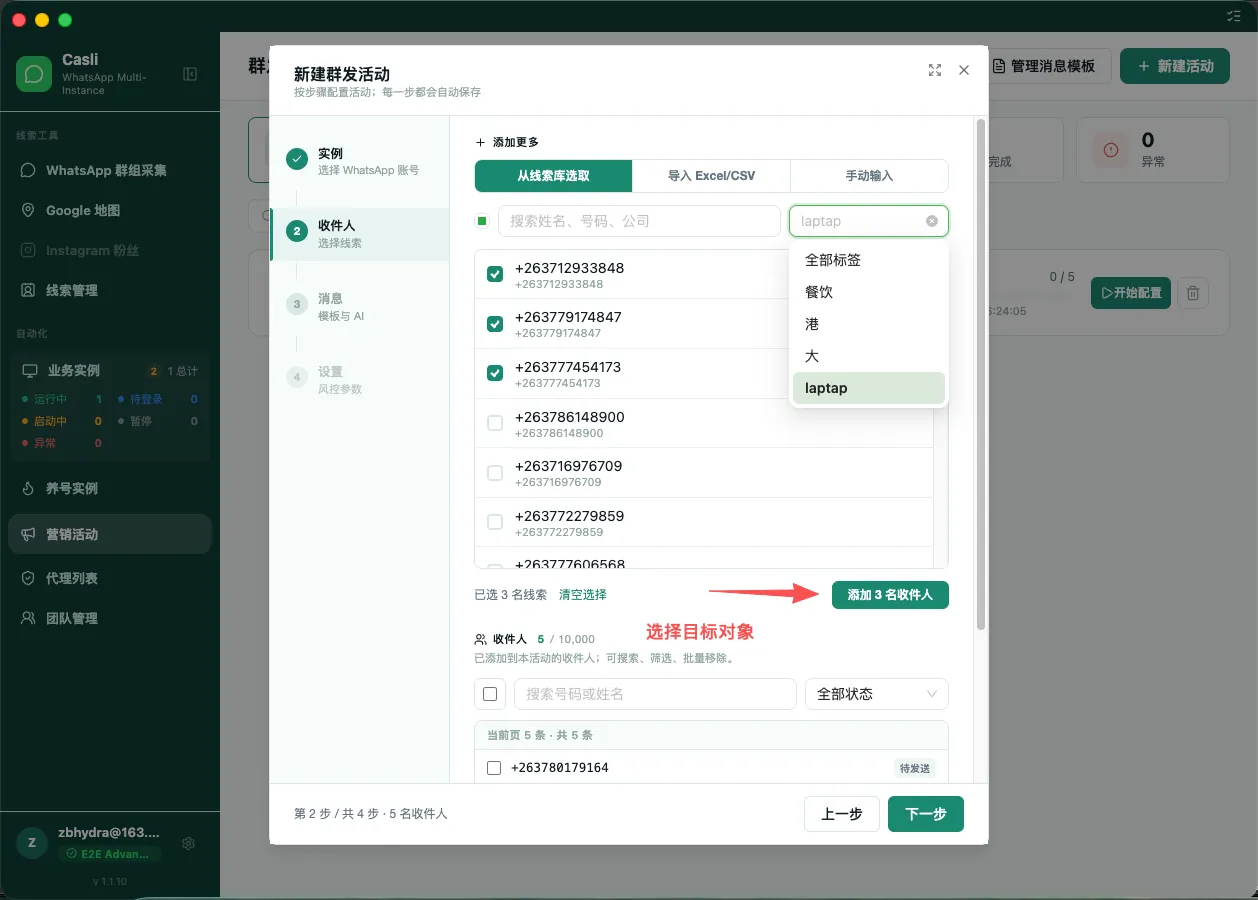
Done when: The recipient count is above zero and the selection matches your test group.
6.3 Add messages
- Under Messages, add the message template to send.
- Review the text, links, contact details, and attachments.
- If you add several templates, check each one and its rotation setting.
- Enable AI Copy Rewriting if needed. For your first run, you can leave it off and test your own message first.
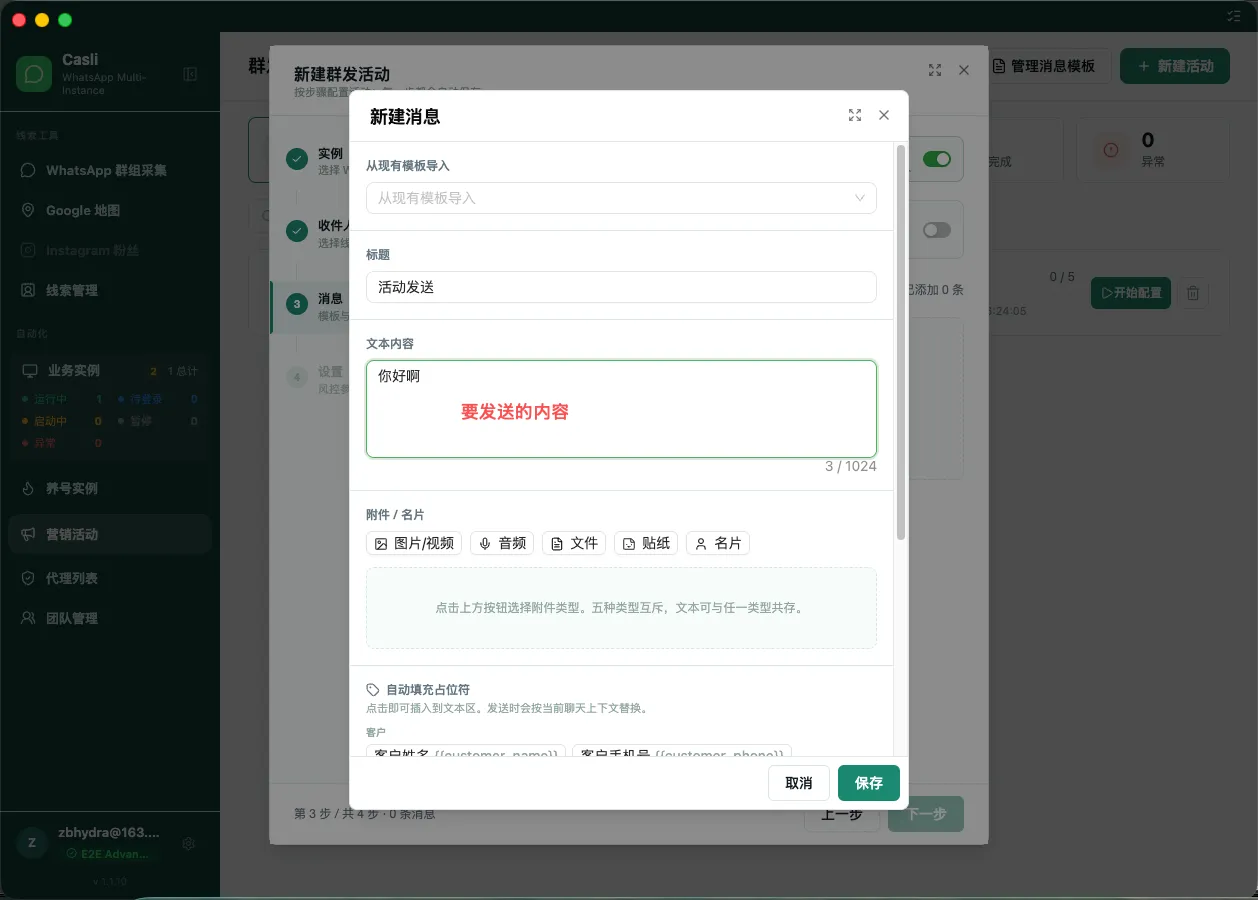
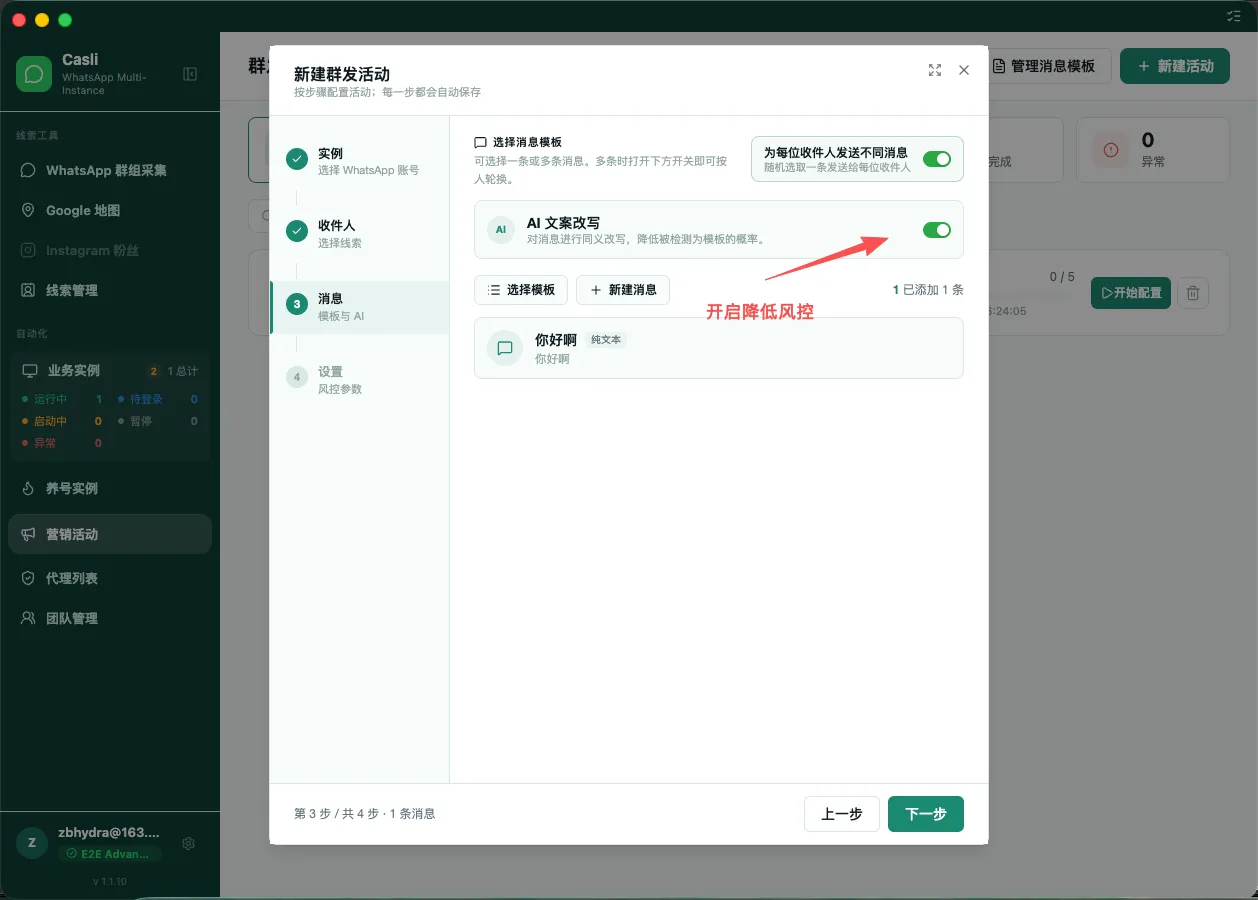
Done when: At least one message is added and every template you intend to use has been reviewed.
6.4 Review settings and start
- Under Settings, check the interval between sends and the pause after a specified number of messages.
- Choose immediate or scheduled sending. For scheduled sending, confirm the campaign’s active window.
- Check Account Protection. If enabled, protection progress must accumulate first; the campaign may wait rather than send immediately.
- Check Automatically Clear Sent Chats. Leave it off if you need the chat history to verify your first test.
- Confirm the sending instance, recipients, and messages, then select Save & Launch.
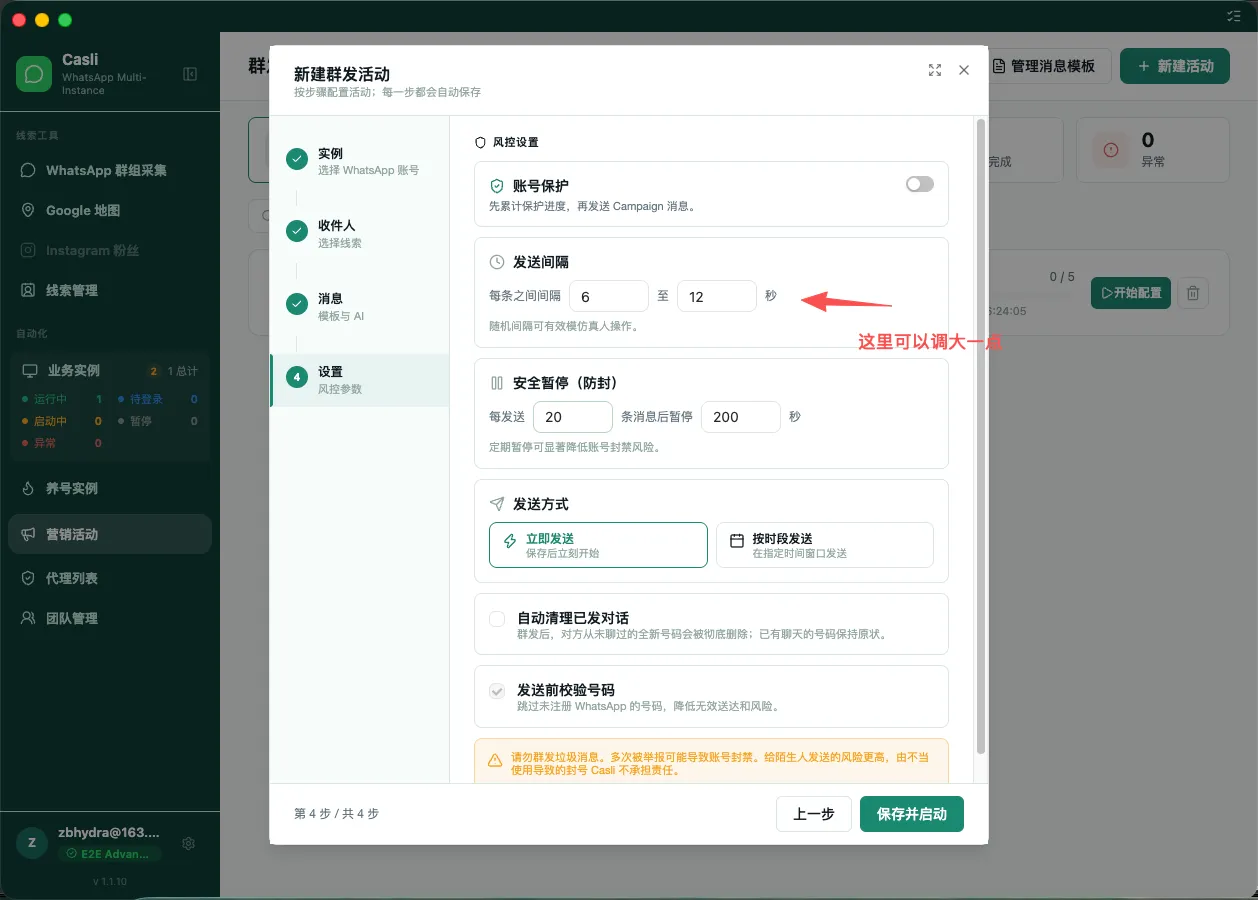
Done when: The app confirms that the campaign started and its list status updates. A successful start does not mean all messages have been sent.
6.5 Check progress, pause, and resume
- Return to the campaign list and check its status and sending progress.
- Ask your test contacts to confirm what they actually received, including links, contact details, and attachments.
- To stop temporarily, select Pause for the campaign and confirm its state becomes Paused. Pausing cannot recall messages already sent.
- Before resuming, confirm the instance is available, then select Resume.
Done when: You have checked actual delivery to test contacts and know how to view progress and pause. The list’s sending progress does not prove the recipient received or read a message.
If a campaign shows as running but progress does not move, see Campaign does not continue sending.
7. Troubleshooting and precautions
7.1 Instance fails to start or keeps loading
A slow or failed proxy is one possible cause, but a loading failure alone does not prove the proxy is at fault. Check in this order:
- Read the error and distinguish a network failure from a request to log in again.
- If using a bound proxy, retest it in Proxy List and check its expiration and credentials.
- If using a proxy tool on your computer, confirm it is connected and the chosen mode is active.
- Restart the instance after resolving the issue; if a login page appears, log in first.
- If it still fails, record the instance name, time, and error message, take a screenshot, and contact support.
7.2 Cannot find newly imported leads
Confirm that import finished, then read the added, updated, skipped, invalid, and failed counts. Existing records may have been updated instead of added again. Check Lead Management filters in case they hide the records.
7.3 Cannot move an instance
Read the move notice: is the instance still running or assigned to a campaign or another task? Follow Change an instance’s purpose. Pausing an instance and releasing its task assignment are separate steps.
7.4 Campaign does not continue sending
- Draft: Complete the configuration and select Save & Launch.
- Paused: Check whether it was paused manually or by the sending window, then resume or wait as appropriate.
- Waiting for an available instance: Check that the chosen instance is started and logged in, and whether it is cooling down or has reached today’s limit.
- Waiting for account protection: Check account-protection settings and instance states, and wait for the required progress.
- Error or failed action: Follow the error guidance first. If Retry is available, use it after resolving the problem; do not repeatedly create the same campaign.
Keep the Casii app running, the network connected, and the sending instances online during execution.
7.5 About account restrictions
Warm up before bulk messaging. Sending in bulk to strangers from a new or long-inactive account may quickly trigger platform controls. Follow the warm-up section first, then start with a small test.
The platform may consider account history, network conditions, sending behavior, and user feedback when restricting an account. Sending similar messages to many strangers in a short time, recipient reports, and frequent changes to the network exit are risks to watch. No single factor proves the cause.
- Do not use an important support account for campaign tests. Start small and check actual results.
- Watch proxy stability, exit changes, and provider usage limits. A “residential proxy” is not a safety guarantee.
- If the account shows a restriction or unusual warning, stop related sending and read WhatsApp’s notice. Repeatedly restarting a task is not a fix.
- When a recipient needs to contact a designated support agent, include the agent’s contact card or details in an appropriate message.